Illumination
The options in this group of the Shading tab in the RenderZone Options dialog control the illumination of the scene that is being rendered.
Light Intensity: The intensity of lights in RenderZone can be specified in three ways: as a basic global intensity expressed in a percentage figure, globally in physically accurate units, or these options can be applied separately per light. The Light Intensity menu contains three items as follows:
- All Simple: When this item is selected, simple light intensity, which is defined as a percentage, is used for all the light sources in a rendered scene. Selection of this item overrides any intensity selection made individually for the lights.
- All Accurate: When this item is selected, accurate intensity is used for all the lights. Accurate intensity is defined using physically accurate intensity units. Selection of this item overrides any intensity selection made individually for the lights.
- Per Light: When this item is selected, the intensity type set for each individual light source is used. Whether a light emits with simple or accurate intensity is selected in the Light Parameters dialog, as described in section 5.2.
Area/Line Lights: The three options in this pop up menu determine how area/line lights will be treated in the rendering. Note that rendering area and line lights can significantly affect rendering speed, which is why the options in this menu allow you to bypass them, especially during preliminary rendering stages. A Quality slider bar for area and line lights can be found in the Light Parameters dialog when an area or line light is selected. Depending on the setting of the slider, the quality of illumination and shadows generated by area and line lights can be controlled, at the expense of rendering time. Area and line lights are discussed in detail in section 6.
- Ignore: When this option is selected, the area/line lights that may be in a scene are ignored and not included in the rendering.
- Approximate: When this option is selected, any area/line lights encountered in a scene are processed by RenderZone* as point lights.
- Use: When this option is selected, area/line lights are processed as area/line lights. Selecting this particular option affects the rendering speed as mentioned above.
Light Glow: Selecting this option allows you to globally control the use of glowing lights in a rendering. For glowing lights to be rendered, the glow options for each individual light must be turned on in the Light Parameters dialog, in addition to selecting this option. Deselecting this option will disable the light glow effect for all lights, including those for which it has been individually set.
a 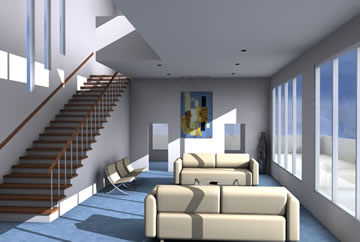
b 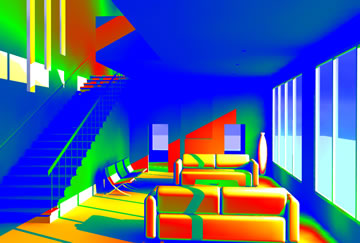
c 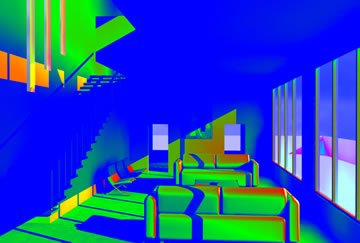
Figure 1.3.1: A rendering with (a) no analysis, (b) Illuminance,
and (c) Luminance.
Precompute Exposure Correction: When this option is selected, the intensity of the final rendering is corrected automatically to not produce any over or under exposed images. This is achieved by first measuring the level of exposure of the image before it is rendered. This step happens before the first scanline is rendered and may take a short while to complete. Once the actual image is rendered, areas which would otherwise be overexposed will be corrected to show better illumination. Likewise underexposed areas are rendered with increased illumination. The purpose of this option is to avoid a rendering which is completed washed out with strong light or completely dark because of lack of lighting. It may be necessary to further fine tune the final image exposure using the Exposure Correction option of the RenderZone Postprocess feature. This is discussed in more detail in section 1.10.
Analysis: If this option is selected, an illumination analysis is available. With this option on, the
current rendering will not show the colors from the surface styles associated with each object in the scene, but the light intensity on a surface is visualized using a color coding scheme. In architectural design it is a common task to design the lighting of a space so that certain illumination criteria are met for the activities performed in the space. For example, in an office space light intensities on the desktop surface should be around 250 Lux. Properly lit scenes rendered with accurate intensities can show whether such lighting criteria are met. Recall that accurate light intensities are used by choosing All Accurate from the Light Intensity menu. In this example, surfaces which are 250 Lux or higher can be rendered in a specific set of colors which immediately show if the criteria have been met. The resulting image is not unlike a picture taken with a heat sensitive camera as shown in Figure 1.3.1.
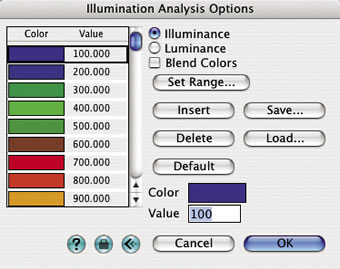
Figure 1.3.2: The Illumination Analysis Options dialog.
Clicking on the Options... button next to Analysis invokes the Illumination Analysis Options dialog shown in Figure 1.3.2. The colors to be used for the light intensities are set in this dialog.
Color/Value: This list on the left of the dialog contains colors assigned to different values. These colors are used to represent the respective value when the illuminance or luminance diagrams are created. If the intensity of a surface pixel is no larger than the closest value in the list, it is rendered with the color shown next to the value. For example, a pixel with intensity of 650 would render in red, according to the options shown in Figure 1.3.2. A value in the list can be edited by clicking on the text in the highlighted row. This will display the value in the text field next to the list where it can be edited. The color of the selected item in the list is shown in the color field next to the list. Clicking on it invokes the standard Color Picker dialog.
Illuminance: If this option is selected, the rendering shows the illuminance of all surfaces. Illuminance is the amount of light intensity received on a square unit area and is measured in Lux. Rendering the illuminance of a scene gives a measure of how much light is received on a surface and can be used to determine proper lighting conditions in a space.
Luminance: If this option is selected, the rendering shows the luminance of all surfaces. Luminance is the amount of light intensity reflected by a surface, also measured in Lux. Rendering the luminance of a scene gives a measure of how bright a surface appears to an observer. It may be used for example to find areas with a high degree of glare.
|
|
|
|---|
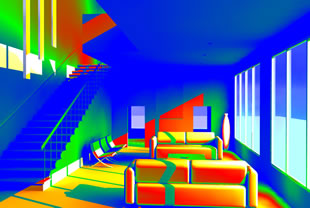
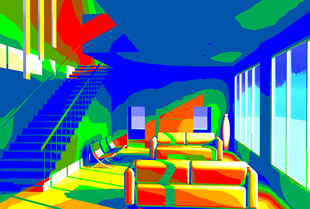
Figure 1.3.3: A rendering (a) with and (b) without blended colors.
Blend Colors: If this option is selected, the color value of a pixel is interpolated smoothly between the colors of the closest color/value pair. An example of a rendering with and without blended colors is shown in Figure 1.3.3.
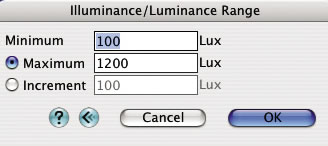
Figure 1.3.4: The Illuminance/Luminance Range dialog.
Set Range...: Clicking on this button invokes the Illuminance/Luminance Range dialog (Figure 1.3.4), where the values in the Color/Value list can be set using uniform increments. If the maximum value is specified, the values in the list are divided into equal increments, starting at the minimum and ending at the maximum. If Increment is selected, the values in the list start at the minimum and are incremented in each row by the increment value. Note that after the increments are set uniformly through this dialog, they can still be changed individually by editing them.
Insert: If this button is selected, a new color/value pair is inserted above the current row.
Delete: If this button is selected, the current row is deleted.
Save...: If this button is selected, a set of color/value pairs can be saved to a text file.
Load...: If this button is selected, a previously saved file with color/value pairs can be loaded.
Default: If this button is selected, the default set of color/value pairs is loaded.
Note that there is a significant difference in rendering illuminance versus rendering luminance. For example a black surface that absorbs most of the incoming light may have a high degree of illuminance, but has very little luminance, since no or little light is reflected back into the environment.
For accurate studies of the luminance/illuminance of a scene it is necessary to execute a reasonably complete radiosity solution. Radiosity accurately simulates the light reflecting off surfaces and illuminating other surfaces in the scene. This secondary illumination is necessary to accurately describe how a scene is illuminated in areas which are not reached by light sources directly. A RenderZone rendering which is not based on a radiosity solution, although using accurate light intensities, only applies a constant ambient light in areas not illuminated directly or a one bounce light reflection through Final Gather. Thus, a color analysis of this rendering will not be accurate. However, it may be sufficient to get a basic impression of whether the light sources in the scene are defined with the proper intensities.