Creating and editing materials
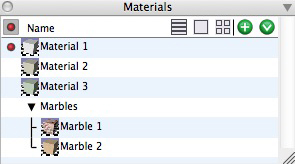
The Materials palette in List view with Material groups.
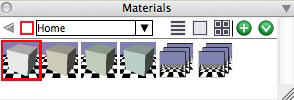
The Materials palette in Small Icon view with
Material Groups.
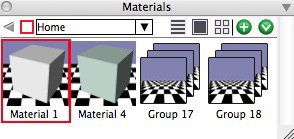
The Material palette in Large Icon view with Material Groups.
The Material Palette drop-down menu.
Materials control the appearance of objects when thay are rendered in form•Z. They can be drug directly from the Materials Palette and dropped onto objects in the project window in order to apply them. All Materials that are in a project are displayed together in the Materials palette on the right side of the project window in the Palette Dock. One Material is active at any given time, and is highlighted with a red dot or a red border, depending on which view mode is in use. The currently active Material is assigned to all newly created objects. The Materials Palette also supports the grouping of Materials. Materials can be drug from any location in the palette and dropped into a Material Group to add it to the group.
The icons across the top of the palette control which type of display the Materials are shown in and allow access to further options.
![]() When in List view, as shown at upper right, the red dot in the upper left hand corner of the palette denotes a column beneath that will contain only one copy of the red dot in fornt of a Material at a time. This is the currently active material. As you create new objects, the Active Material will be applied to them.
When in List view, as shown at upper right, the red dot in the upper left hand corner of the palette denotes a column beneath that will contain only one copy of the red dot in fornt of a Material at a time. This is the currently active material. As you create new objects, the Active Material will be applied to them.
![]() When in either Small or Large icon view, this back arrow will return you to the smain Materials list or take you up to the next level in the group hierarchy if you are currently inside of a Material Group. This icon will be displayed in gray (
When in either Small or Large icon view, this back arrow will return you to the smain Materials list or take you up to the next level in the group hierarchy if you are currently inside of a Material Group. This icon will be displayed in gray (![]() ) if there is no group above the current location, or if you are already at the topmost hierarchical level of the main Materials list.
) if there is no group above the current location, or if you are already at the topmost hierarchical level of the main Materials list.
![]() Clicking this icon when in either Small or Large Icon view will make the current Active Material visible in the palette by displaying the group that the current Active Material is located in if it is not already displayed. This can make locating the Active Material easy if it is not currently visible and you are unsure of what group is in.
Clicking this icon when in either Small or Large Icon view will make the current Active Material visible in the palette by displaying the group that the current Active Material is located in if it is not already displayed. This can make locating the Active Material easy if it is not currently visible and you are unsure of what group is in.
![]() This icon invokes the List View.
This icon invokes the List View.
![]() This icon invokes the Large Icon View.
This icon invokes the Large Icon View.
![]() This icon invokes the Small Icon View.
This icon invokes the Small Icon View.
![]() This icon will create a new Material. This new Material will be added to the bottom of the palette.
This icon will create a new Material. This new Material will be added to the bottom of the palette.
![]() This icon will reveal a list of contextual options. Some of them replicate the functions provided by the icons at the top of the palette. The menu items that have other functions are described below.
This icon will reveal a list of contextual options. Some of them replicate the functions provided by the icons at the top of the palette. The menu items that have other functions are described below.
New Group: This menu item creates a new Material Group.
Delete: This menu item deletes the currently highlighted Material.
Edit...: This menu item will invoke the Material Parameters palette for the currently selected Material so that it's settings can be adjusted. The Materials Parameters palette is dicussed in the next section.
Duplicate: This menu item will create an exact copy of the currently selected Material and place the new Material at the bottom of the list palette. This is useful if you wish to make a new Material that shares a large number of similar settings, and you simply wish to tweak a few of them to modify the material's appearance.
Active: This menu item makes the currently selected Material the Active Material.
Sort: This menu item will sort the list of Materials in the palette alphabetically.
Purge...: This menu option will remove from the Materials Palette list any Materials that are not in use. In other words, if there are any materials that are in the materials list that are not applied to objects, these will be removed.
Assign Picked Objects This Material: This menu item will allow you to apply the currently selected Material to any objects that are currently selected in the project.
Manual: This menu item invokes the form•Z online manual and opens it to this page.
The Material parameters palette
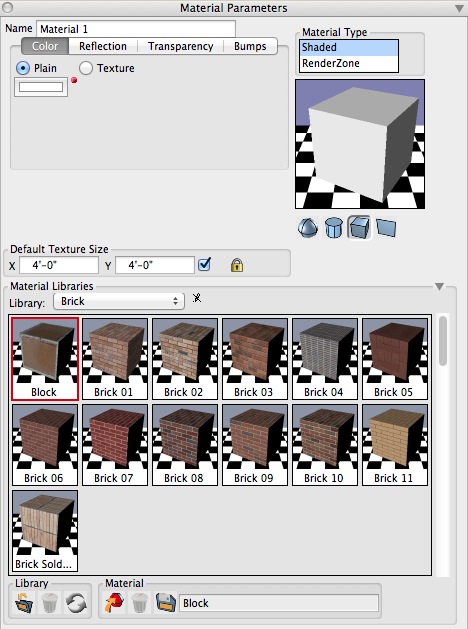
Expanded Material Parameters palette.
Double clicking on the icon of an existing Material in the Materials Palette opens the Material Parameters palette. It displays the parameters that allow you to fine tune the appearance of the Material when rendered on an object. Clicking on a different icon in the Materials palette will select that material as the active material and display its parameters in the Material Parameters palette. By default, the parameters shown in the palette represent a generic material. The parameters allow you to apply a Color, which can be Plain or a Texture map. You can also set a Reflection and/or Transparency, which can be linear or derived from a transparency map. You can also assign a Bump map. This is usually a grayscale image designed to produce surface detail. Using the Material Parameters a number of effects can be simulated, such as plastic, glass, or wood. A preview of the material is shown at the right side of the palette, and the Material has been applied to a primitive and rendered. You may change the primitive that is used for the preview by clicking on the sphere, cylinder, cube, or plane beneath the preview window.
Default Texture Size: These parameters determine how large a texture will appear on an object, when the material is first applied. For example, if a texture shows a brick pattern with 5 bricks in 8 rows, the size should be set to 40” x 18”, assuming a standard brick size of 8” x 2 ¼”. This guarantees that the texture appears in its real world size on an object by default. The texture size on an object can be customized with the Map Texture and Edit Texture tools.
Choosing a predefined material
In addition to manipulating the parameters of the default material, a specific predefined material can be selected from a list of Material Libraries, displayed by expanding the Material Parameters palette, which is done by clicking in the open/close widget at the lower right corner of the palette. An expanded palette is shown.
At the top is the Library pop up menu from which a category of materials can be selected. The materials of the selected library are displayed below as icons. The parameters of one of those predefined materials can be applied to the current or other materials, using one of these ways:
1. Click on the Apply (
) icon at the bottom of the palette.
2. Double click on the graphic icon of a predefined material.
3. Drag the graphic icon of a predefined material on top of the material preview window at the upper right corner of the palette.
4. Drag and drop a predefined material on top of a material icon in the Materials palette to apply its parameters to that material.
5. Drag and drop a predefined material on top of an empty spot in the Materials palette to create a new material.
Defining your own predefined materials
Form•Z comes with a large selection of predefined materials. However, you may also create your own selection of materials so that they can be used in future projects. The standard form•Z materials are stored as files in the Form•Z Materials folder, located in the same directory as the form•Z application folder. These materials and libraries cannot be altered. New user defined materials and libraries are saved to a folder also named Form•Z Materials in the user’s documents folder.
To create a new user defined material, a new library must be created first by selecting Add Library... from the Library menu, or the default user library “My Library” may be selected. The parameters of the current material, as shown in the top portion of the Material Parameters palette, can be saved as a predefined material in three ways:
1. Click on the Save (
) icon at the bottom of the palette.
2. Drag/drop the preview window on the predefined materials section.
3. Drag/drop a material icon from the Materials palette on the predefined materials section.
A previously created predefined material may be deleted by clicking on the Delete (![]() ) icon at the bottom of the palette.
) icon at the bottom of the palette.
Textures
Textures that are used in Form•Z are embedded in the project file when it is saved. This is so that if you transfer a file from one machine to another, the textures will still be available. This is a feature that helps in a pinch, but is not the intended method for routine work. Keeping your textures in a well-marked folder, preferably one that can be stored in the same folder as the project is highly recommneded. This feature, which is on by default, stores copies of the images internally, and makes the file size larger. There in an option to not keep copies of the images on a per project basis in the Project Settings/Project Files. There is also an option under Project Files that allows the user to specify the level of compression used when copies of the textures are kept in the file.