Subdivision Surfaces
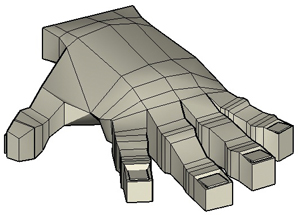
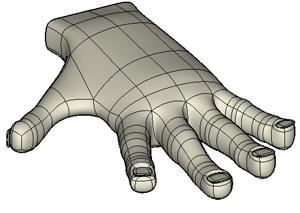
Subdivision Surface modeling is a technique that takes a simplified “cage” mesh (a standard facetted object that has had subdivision applied) and subdivides the existing polygons to create a smoother derivative surface. The relative distances between vertices and segments in the facetted cage directly control the shape of the subdivision.
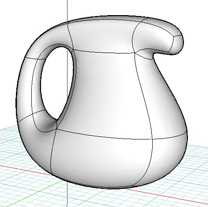
Subdivision surfaces enable the modeling of complex smooth surfaces with simple, low-vertex meshes, allowing smooth, organic, high-resolution mesh modeling derived from simple geometry. The subdivision technique can be used to add detail to an object, or to smooth it out.

Subdivision surfaces get their name from their characteristic: “dividing into regions of greater detail”. This modeling technique begins with a base mesh and divides and subdivides regions into finer detail, with each subdivision giving greater control in that area. That is, a region of a surface that has a complex shape can have more control points to allow finer detail, while a more simple or flat region will have fewer control points. The form•Z subdivision system is based on the Catmull-Clark algorithm [Catmull and Clark 1978]. At each increasing level of subdivision, each face gets split into four new faces. For this reason and others, one important aspect of good subdivision modeling is the construction and maintenance of a polygonal structure that is made up of polygons that are four sided. The subdivision tools in many case help to preserve an underlying "quad" mesh. This allows the subdivision operations to have predictable results when dividing, or adding new faces.


Advantages of subdivision surfaces
There are several advantages to using Subdivision Surfaces for modeling:
Subdivision surfaces allow higher level of control over form than polygons.
Allows for the use of complex geometry only in complex regions of a model.
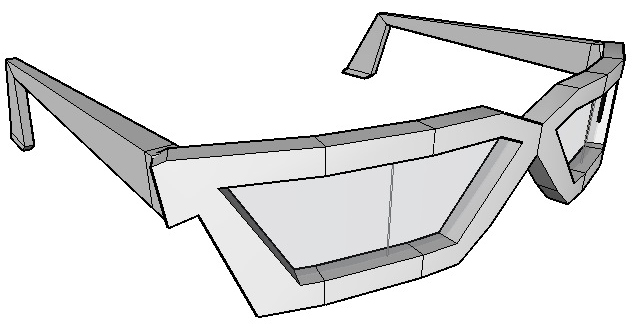
Allows creases (sharp edges) in conjunction with smooth and flowing surfaces.
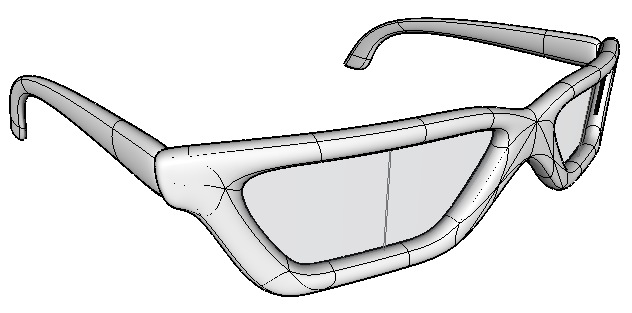
To work with Subdivision surfaces, first create a polygon/facetted object, called a cage, that roughly captures the basic shape of the model you wish to build. Try to construct it so that its polygonal structure is entirely (or primarily) made up of four-sided faces. This model will determine the base topology and the locations of control points on the resulting surface when you convert it to a subdivision surface. Each segment will be a subdivision edge, and each point will become a subdivision control point. As you work on the model, you can convert freely between the subdivision surface and the underlying polygonal “cage” geometry. Use the Swap tool to go back and forth rapidly between the polygonal geometry, and the subdivision surface. This can be quickly done by assigning a key shortcut, so simply tapping a key will make the change occur.

After you convert the polygonal mesh to a subdivision surface, you can adjust the shape of the subdivision surface by moving the control points when the controls are showing, or by using the Transform tools on the points, segments, and faces of the surface itself. You’ll find you can use many of the existing form•Z tools to edit the object, or you can use the subdivision specific tools. Some modeling tools will work better in the facetted mode, and others will work better in subdivision mode. By toggling back and forth between the states, you can utilize the power of both modeling toolsets.
If you need more control in a particular region of a subdivision mesh, you can select those faces and create a new subdivision level with the Divide tool. If you want to apply a sharp edge to a region of the surface you can apply either a full or partial crease to a subdivision object, face, or segment.
A Cage is a facetted object that essentially is the object before subdivision, which becomes the controlled object after it has been sub-divided. You can also Show Controls on subdivision objects in the same way that you can with other parametric objects in form•Z. These controls can be on or off, as with any other controlled object, (F6) can be used to toggle the visibility of these controls. The subdivision tools will operate directly on showing control lines as well as faces, segments, and points. It is not neccessary to hold down cmd (OS X) or ctrl (Windows) when applying the subdivision tools at the sub-object level when the controls are showing, but it is required when they are not.