 Edit Texture
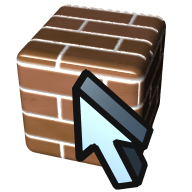
The Edit Texture
Tool Options palette.
With the Edit Texture tool, the location, rotation,
The texture editing controls.
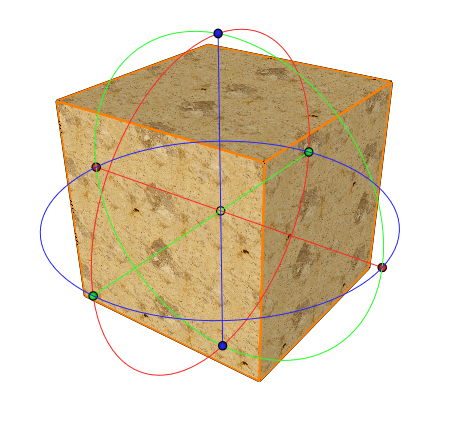
The Edit In 3D texture editing controls.
and size of a texture can be edited interactively. As with the Map Texture tool, it is best to first assign a material with a texture map to an object and enable the Texture option for the shaded display modes (Shaded Work, Shaded Full). With the Edit Texture tool active, select one face. This causes on-screen controls to be displayed. You can now click on these controls to interactively edit the location, size, and/or rotation of the texture. As you do this, the values of the parameters you are changing are displayed in the Tool Options palette. Alternatively, you can numerically change values of the parameters and these changes will be reflected in the graphic display.
The on-screen editing of the controls can be performed in two different ways, which are determined by options selected from the Tool Options palette.
Edit On Face: When this option is selected, which is the default, the editing of size, location, and rotation of a texture occurs on a flat, cylindrical, or spherical surface, depending on the mapping type. For example, for flat mapping, the controls allow movement of the texture only in the plane of the flat mapping.
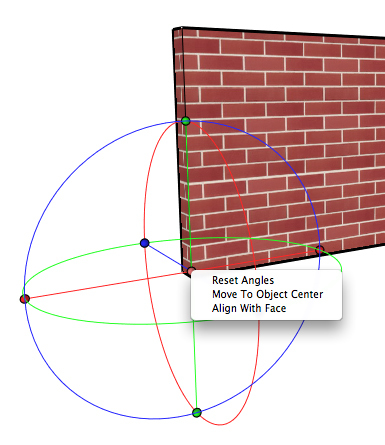
Edit In 3D: When this option is on, the origin and rotation of the texture map are edited in 3D space. The on screen controls allow the origin to be moved anywhere in 3D and the circular controls allow rotation around the three orthogonal axes.
If a texture was assigned with the Best Match Per Object or Best Match Per Face option, it is usually not necessary to edit the texture in 3D, but simply adjust placement and size with the Edit On Face option.
Depending on which texture mapping type is assigned to a face, the on screen controls of the Edit On Face behave differently:

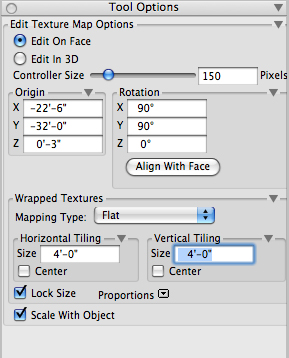
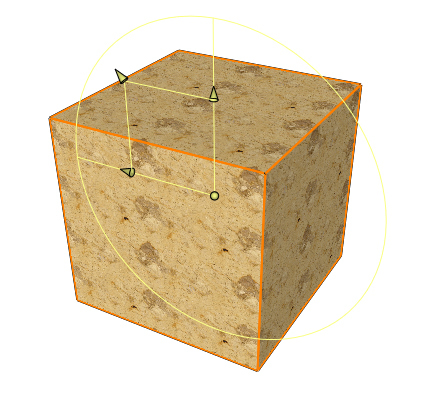
The Edit On Face controls for Flat mapping.
Flat:
Bullet: Changes the location on the plane of the flat map. It can be moved freely in any direction on that plane.
Axes: Moves the texture along the direction of the respective axis.
Ring: Changes the rotation of the texture on the plane.
Arrows: Changes the size of the texture horizontally, vertically, or both.
The Edit On Face controls for Cubic mapping.
Cubic:
As for Flat mapping. The plane in which the map is edited is one of the three orthogonal directions of the cube. Initially the selected face determines that plane. It can be switched by clicking on the XY, YZ, or ZX option in the Tool Options palette.
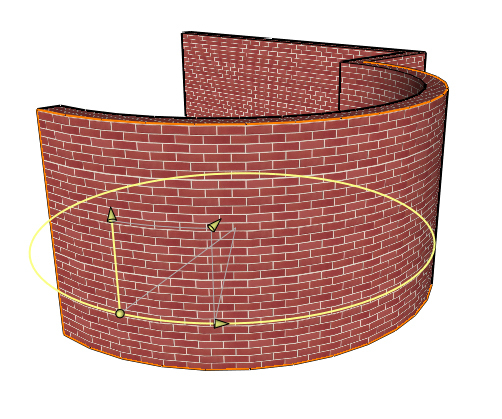
The Edit On Face controls for Cylindrical mapping.
Cylindrical:
Bullet: Changes the location of the texture on the imaginary cylinder surrounding the face. It can be moved in any direction on the cylindrical surface.
Straight Axis: Moves the texture along the axis of the cylinder.
Ring: Moves the texture around the cylinder.
Arrows: Changes the size of the texture horizontally, vertically, or both.
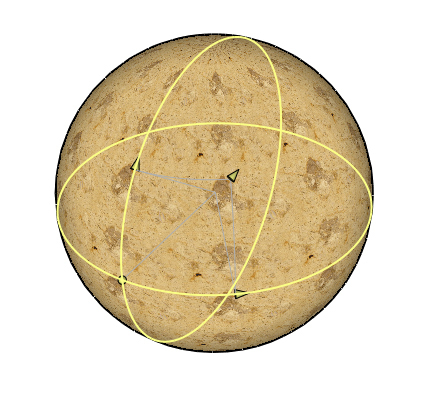
The Edit On Face controls for Spherical mapping.
Spherical:
Bullet: Changes the location of the texture on the imaginary sphere surrounding the face. It can be moved freely in any direction on the spherical surface.
Rings: Moves the texture along the ring direction.
Arrows: Changes the size of the texture horizontally, vertically, or both.
The Edit On Face controls for Parametric mapping.
Parametric:
Bullet: Changes the location of the texture on parametric surface. It can be moved freely in any direction on the surface.
Sliders: Changes the size of the texture in percent.
The Edit On Face controls for UV Coordinates mapping.
UV Coordinates:
Sliders: Changes the size of the texture in percent.
Useful hints
While editing the on screen controls, object snapping is enabled. This makes it easy, for example, to align a brick texture exactly with the edges of a wall and to orient the brick direction horizontally.
Clicking on any of the on-screen controls with the right mouse button invokes a Context menu.
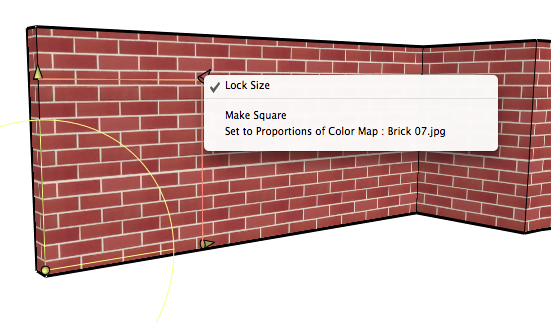
When using the Edit On Face option, this menu allows you to lock the size of the texture to the current proportions (Lock Size), lock the size to square (Make Square), or lock it to the proportions of any of the textures used by the material on the face (Set To Proportions Of Color Map, Set To Proportions Of Transparency Map). Next time the texture is resized using the diagonal arrow, the proportions of the texture in 3D will be constrained according to the menu choice.
When using the Edit In 3D option, the Context menu provides shortcuts to set all angles to 0 (Reset Angles), to move the center of the texture map to the object center (Move To Object Center), and to align the axes of the texture map with the direction of the face (Align With Face).
|
|
 |
|
|---|---|---|
The Context menu invoked when right-clickingon a control, while Edit On Face is used. |
The Context menu invoked when right-clickingon a control, while Edit In 3D is used. |
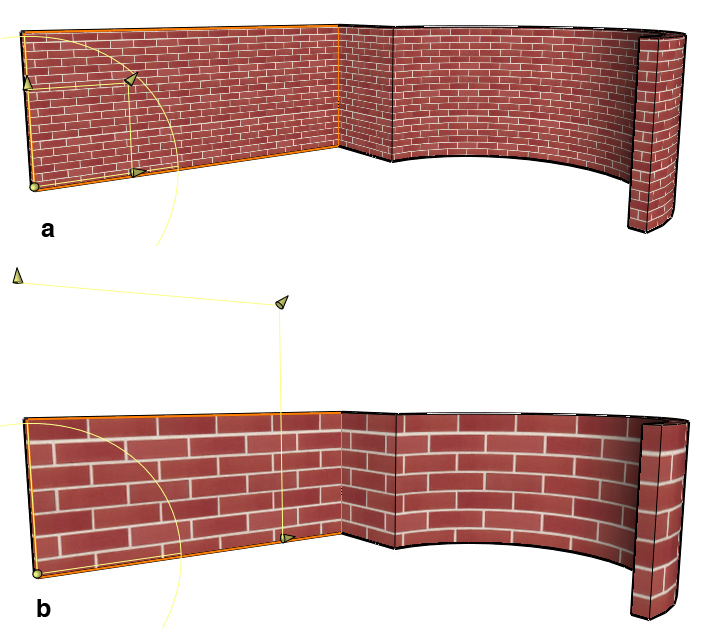
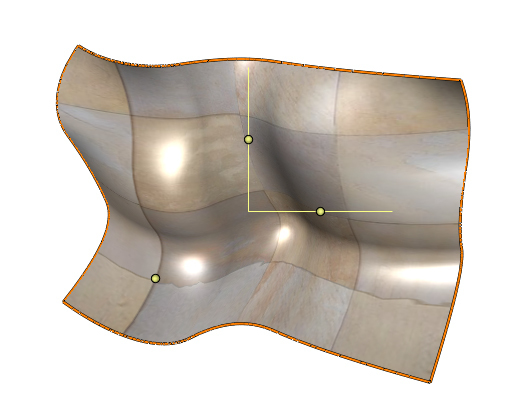
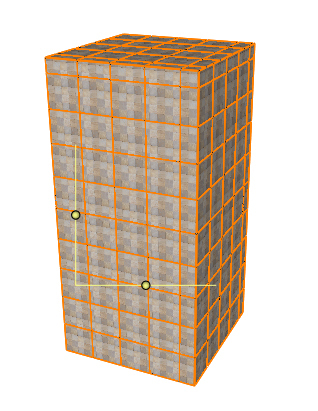
When using the Best Match Per Face option and you are assigning textures to an object with the Map Texture tool, each individual face receives the appropriate texture mapping type. The Best Match Per Object option applies the same method, unless the object type chooses to use another, more appropriate mapping type. To make editing of textures on an object easier, the sizes of all individual texture maps are linked. That is, when editing the size of a texture map on one face of the object, the size of all other textures on the object change as well.
In the example below, a wall object with straight and curved components is created. A surface style with a brick texture is assigned. Next, the Map Texture tool is applied using the Best Match Per Object option. This creates individual texture mapping on each face, including the curved faces. Now the Edit Texture tool is used on one of the faces. The texture is resized with the diagonal arrow control. Note that the sizes of all faces of the object change, keeping the bricks the same. However, changing the location and rotation of the texture mapping on one face would not have affected the other faces.