Animate a bouncing ball
In this tutorial, you will create a bouncing ball. You will first generate a model of a sphere and then you will animate it.
-
In the Modeling workspace, select the Sphere tool (
 ). In the tool options select Preset (
 ) and change the Radius X to 6". With grid snap on (
  ), click once on the center of origin of the reference plane (there are several ways to create the sphere, feel free to use whatever technique you like).
-
Double click the middle mouse button (3 button mouse), click the Fit All button (
 ) or zoom to whatever scale that allows you to see the sphere well.
-
To the right of the Grid Snap icon, set grid snapping to 6". Click on the sphere with the Move tool
(
 ), toggle the perpendicular switch by tapping the Command key (Macintosh) or Control key (Windows) and move the sphere vertically 6" along the Z axis (so that the bottom of the sphere is on the XY plane).
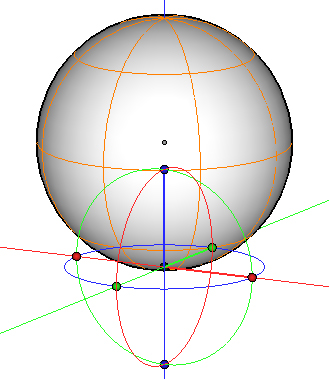
The sphere with its local
axis moved to its lower end.
You will next move the local origin and axes of the sphere to its lower end, which currently sits on the origin of the reference plane.
With the Edit Axes tool click on the sphere.
This displays the local axes and origin of the sphere.
-
Click on the axis origin and drag it to the bottom of the sphere along the Z axis, as shown to the right.
You will next add some basic animation to the sphere, change workspace to Rendering/Animation.
Activate the Keyframe tool and click on the sphere.
While nothing very visible happens, the sphere has been animated and a keyframe symbol appears in the Animation Time Line palette. Also, animation information has been entered in some of the other animation supporting palettes, as you will see soon.
-
From the Palettes menu, open the Animation Editor palette.
-
Click on the little triangle in front of the object name to expose its content. It contains a number of default tracks, which are not needed for this example, therefore they will be deleted.
-
To delete a track, right click it and select Delete from the context menu. Delete all the tracks except for Position Z.
-
Next, in the Palettes menu, open the Animation Options... palette. In the Timing tab change the Time Display Format to Frames. This changes how time will be displayed. Close the palette to return to the main window. Note that some users prefer to work in time units of seconds, others prefer to work using frames.
-
In the Animation Time Line palette, in the Frame field, located at the lower portion, enter 28. Make sure the Auto Keyframe button (
 ) is on.
-
Click on the sphere with the Move tool (
), toggle the perpendicular switch (if not still set) by tapping the Command key (Macintosh) or Control key (Windows) and move the sphere vertically 4' along the Z axis.
-
From the Palettes menu, open the Animation Editor and click on the Fit Visible (
 ) button.
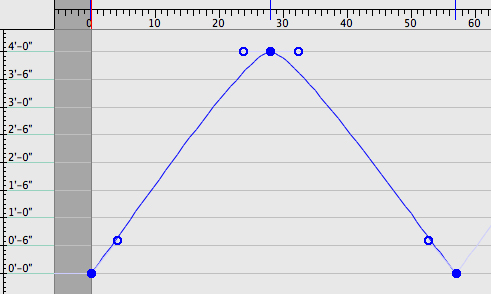
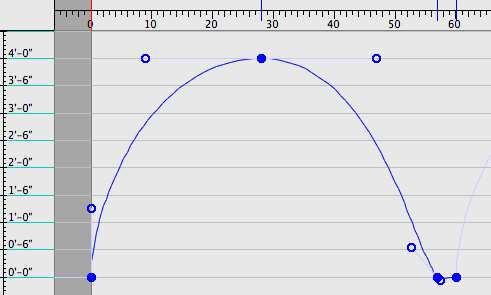
Notice that there is a blue line in the graph that represents the Z position of the sphere. There are also two dots, one at each end of the blue line. These dots represent the keyframes of this track. The line between the two dots shows how the track is inn see that these white dots do not have to be on the blue line and that by moving them in different positions you can control the type and intensity of the motion at the respective keyframe.
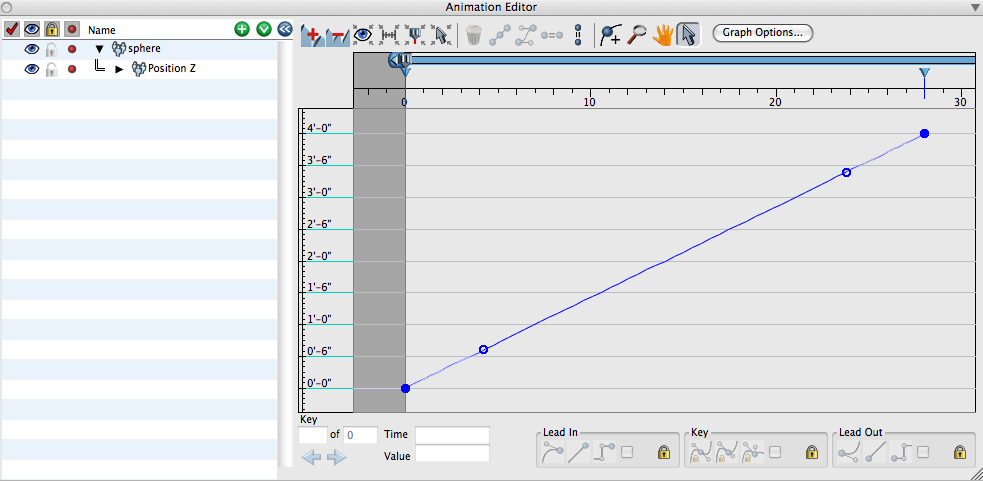
The Animation Editor palette.
You can add more keyframes to tracks by activating the Insert tool ( ![]() ) and clicking in the graph where we want the new keyframe to be added. You will do such an insertion next.
) and clicking in the graph where we want the new keyframe to be added. You will do such an insertion next.
-
Highlight Position Z interpolated between the keyframes. With only two keyframes, the line is straight.
On the line, between the blue dots, there are two white dots. These are at the ends of the leads, which are controls of the keyframes. You will see the list on the left side of the palette.
-
Click on the Zoom Out tool as many times as necessary until you can see the 58 frame mark.
-
Activate the Insert tool (
 ) and click in the graph approximately at the point that has a 0 value (vertical axis) and a 56 frame (horizontal axis). You are assisted by a "hint" display that shows you the position you are at before you actually click to make the insertion. As soon as you click, you notice that a new keyframe or dot is added where you clicked and the blue line is now connecting this keyframe to the first two.
-
Click on the Fit Visible (
) button again.
If you have difficulty inserting a keyframe at exactly the desired position, you can still adjust the position after the insertion has been made. While the keyframe is highlighted, its Time and Value are displayed in two numeric fields at the lower middle portion of the palette. If they do not show 56 and 0, you can type these numbers in.
You will next play the animation up to this point.
-
Minimize the Animation Editor palette.
The Animation Editor palette.
-
In the Animation Time Line palette, with the mouse, move the current time symbol to 0.
-
Click Play. As the time symbol in the palette moves from the 0 to the 56 frame, the sphere bounces up and down once and stops, while the time symbol continues to move to the right. When it reaches the end of the palette it goes back to the beginning and the sphere bounces once again.
If we want the sphere to bounce continuously, we can do it through the Animation Editor palette.
-
Open the Animation Editor palette, right click the Position Z track and select Track Options.... Click the After button and from the pop up menu under it, select Repeat Normal.
-
Click on the Fit Animation (
 )button. The palette should now appear as it does below.
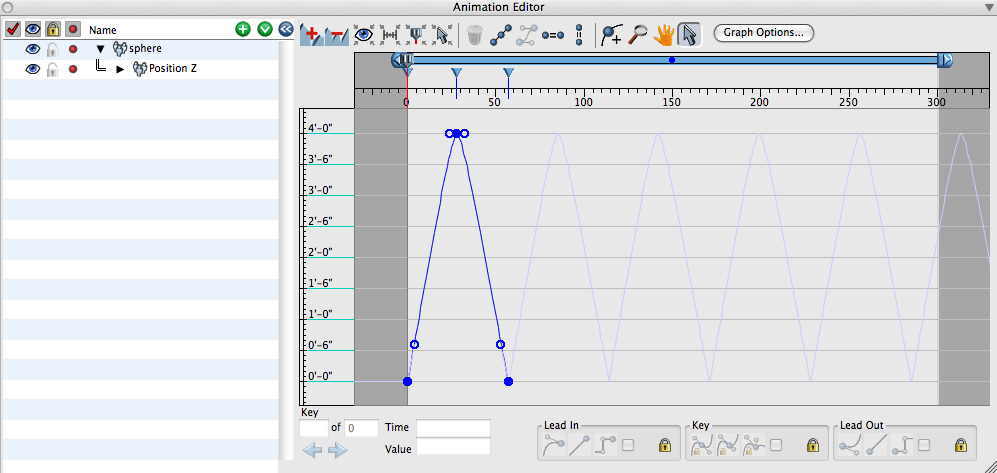
The Animation Editor palette.
In the graph area of the palette, you will see that the original line has been repeated as many times as necessary to fill the time span available for this animation. The repetitions are shown in a light blue line.
Minimize the Animation Editor palette and from the Animation Time Line palette, play the animation again. Observe how it plays continuously.
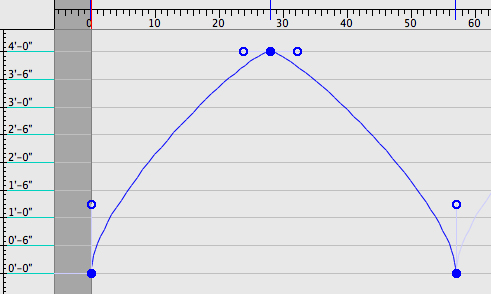
The Animation Editor palette before
adjusting any of its leads.
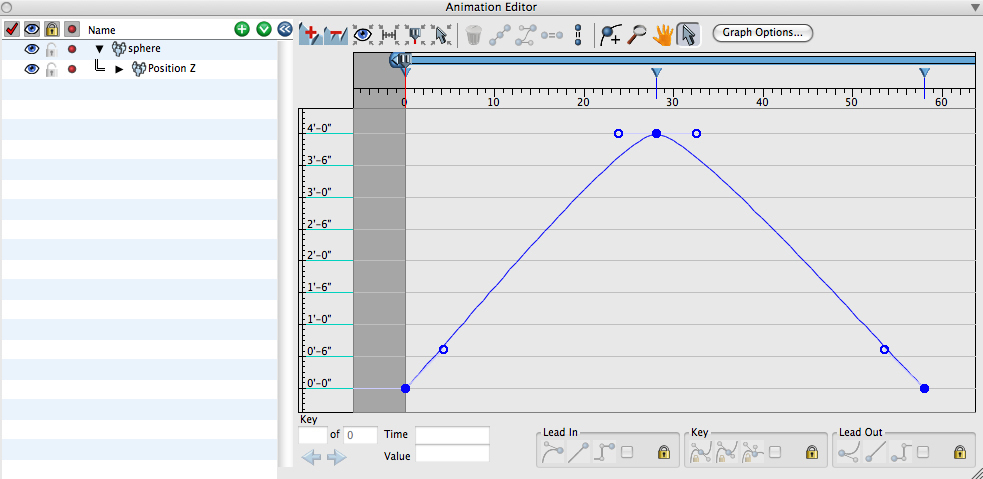
Changing the leads of the first and last
Keyframes, in the Animation Editor palette.
As you were playing the animation and the ball was bouncing up and down continuously, you must have noticed that its motion appeared unnatural and mechanical. In order to make the sphere bounce more naturally, we need to adjust the way in which the position of the sphere is interpolated between the keyframes.
-
Reopen the Animation Editor palette. Click on the Fit Visible (
) button again.
Look at the middle keyframe. Notice the line with the white circles at its ends, coming out both sides of the keyframe. These are the leads that control how the curve enters and leaves the keyframe. You will next manipulate the leads to change how the sphere bounces.
-
On the first keyframe, drag the lead so that it is vertically above the keyframe. Do the same with the lead on the last keyframe.
-
Play the animation. The previous adjustments cause the sphere to transition in and out of the first and last keyframes quicker, which gives the appearance of an abrupt change in direction.
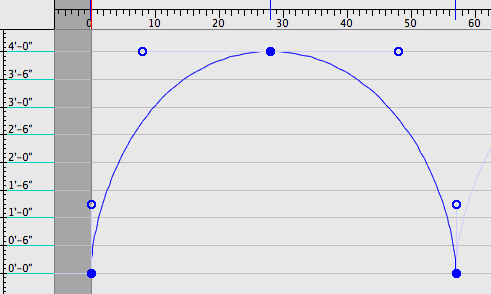
Changing the leads of the middle
keyframe.
-
Back to the Animation Editor palette, select The middle keyframe and in the Key section choose Tangency Locked, Equal (
 ).
).
Extend one of the leads of the middle keyframe away from the keyframe (notice that the other lead extends equally). This makes the line formed at the middle keyframe look like an upside-down U. The middle keyframe corresponds to the upper end of motion of the sphere and the change we just made will make the sphere appear that it is hanging in the air a moment longer.
-
From the Animation Time Line palette, play the animation and observe the differences the changes you just made are causing.
Advanced motion: squash and stretch
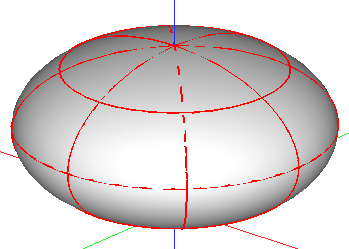
The sphere after being squashed.
In order to make the ball appear as though it interacts with the ground during the bounce, the sphere should be squashed as it bounces. Before we squash the sphere, however, we need to make the sphere contact the ground longer than it does currently.
-
On the Animation Editor palette, with the Insert Keyframe tool (
) active, click on time 60 (horizontal axis) and value 0 (vertical axis).
-
Adjust the new keyframe to have a Lead In type of Linear (
 ). Do this by highlighting the key and in the Lead In section, click the Linear type (bottom of the palette).
-
From the Animation Time Line palette, play the animation. Notice that the sphere seems to hesitate or pause when it is in contact with the ground. This may look unnatural now, but will look right once the sphere is contracting and expanding during this time.
Inserting a keyframe at 60, 0.
-
In the Time Line palette, set current time to 0.
-
In the Animation Editor, right click the name of the sphere and select Add Tracks... from the context menu. This invokes the Add Tracks dialog, which contains a list of tracks that can be added to the active animated object (the sphere).
-
Select the Scale Z track and click OK to close the dialog. If you now click on the triangle before the sphere name to expose its content, you see that it contains two tracks: Position Z and Scale Z.
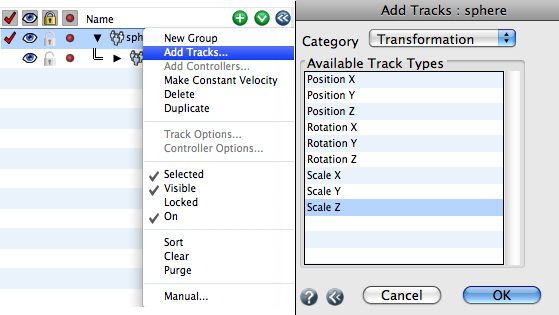
Adding a Scale Z track to the sphere.
-
Go to the list of tracks on the left and click on the eye symbol (
 ), in the second column of the Position Z row. This erases the eye symbol and the display of the graph for Position Z.
-
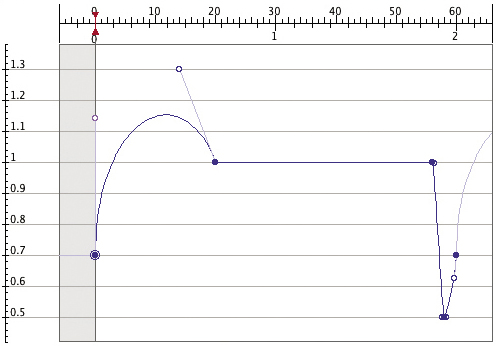
For Scale Z, there should be a keyframe at time 0. Set this first keyframe to a value of 0.7.
-
Insert the following keyframes at times and values: 20 and 1; 56 and 1; 58 and 0.5; 60 and 1.
-
Right click the Scale Z track and select Track Options.... Click on the After tab and from the menu under it select Repeat Normal. Also, check the Connect Beginning And End option. When you do, you notice that the last keyframe changes to the same value as the first, which is 0.7.
-
Click on the Fit Visible (
) button.

The Scale Z track in the Animation Editor palette.
If you are setting up an animation that is meant to cycle many times, you will want the first keyframe to have the same value as the last keyframe. This will make a smooth transition between cycles.
The graph for the Scale Z track, in the Animation Editor palette should now look like the graph to the right.
-
In the Animation Time Line palette, click play. The sphere should now look as though it is being compressed when it hits the ground. We can exaggerate the rebound by making the sphere to actually expand beyond its normal shape when it touches the ground.
Adjusting the Leads for more realistic behavior of the sphere.
-
In the Animation Editor palette, adjust the lead of the first keyframe so that it is pointing vertically.
-
Do the same with the Lead In for the second keyframe.
-
Set the Lead Out of the second key and the Lead In of the third key to be Linear (
,  ). Recall that you do this by selecting the second item from the respective menu below the graph
-
From the Animation Time Line palette, play the animation.
You notice now that, as the sphere leaves the ground, it stretches up. It returns to its normal shape as it approaches the top of its flight.
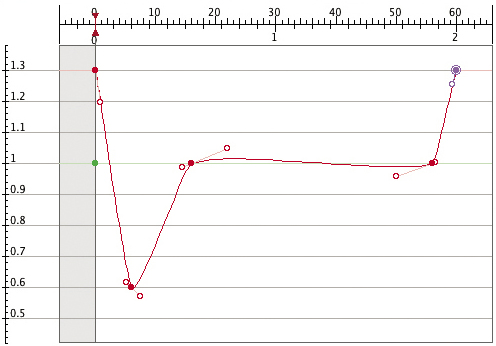
The graph for the Scale X track.
This can be taken a step farther and given some lateral scale that is inversely proportional to the vertical scale. In other words, as the sphere is compressed vertically, it should expand horizontally.
-
Set current time to 0.
-
In the Animation Editor palette, add two more tracks for Scale X and Scale Y.
-
Move the first keyframe of Scale X up to a value of 1.3 at frame 0. This is the point at which the sphere is squashed down at maximum compression.
-
Add a second key at frame 6 with value 0.6. This will cause the sphere to get thinner as it is rebounding up into the air, reinforcing its vertical motion.
-
Make two keys at frames 16 and 56 of value 1. The sphere is at a normal size during its flight.
-
Add a final key at frame 60 of value 1.3 to complete the cycle.
Scale Y will be identical to Scale X and will thus be constructed by copying and pasting all the keyframes from one track to the other.
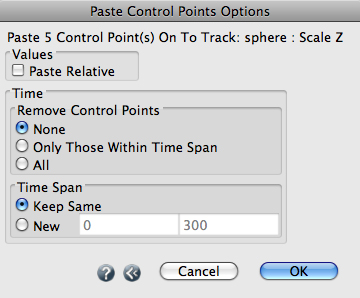
The Paste Control Points Options dialog.
-
Select all the keyframes on Scale X. To do this, press ctrl (Macintosh) or shift (Windows) and click on the line for Scale X. This will select the entire animation curve. Select Copy from the Edit menu.
-
Highlight Scale Y in the Animation Editor palette and select Paste from the Edit menu. As soon as you do, the Paste Control Points Options dialog appears.
-
Change Remove Control Points to All. This will delete all existing control points in the time span we specify. Leave Time Span at the default Keep Same. Click Ok.
Now, Scale X and Scale Y should be the same. Right click each and select Track Options.... Click on the After tab, from the menu under it select Repeat Normal.
Click play in the Animation Time Line palette to see the results of the animation.
