Swinging door tutorial
This tutorial will cover the creation and animation of a door swinging open. This is the first of a sequence of animation tutorials that are covered in this section and covers more details than the subsequent tutorials do. That is, some explanations about what is the meaning of some of the operations you will be asked to apply are included as well as some term definitions, rather than simply giving you instruction about what to do. This way this is more of an introductory session than the following tutorials are.
 |
 |
|---|---|
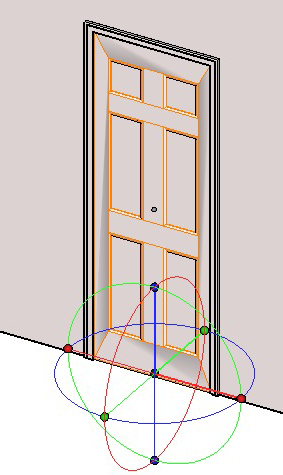
The door with theaxis at its basis. |
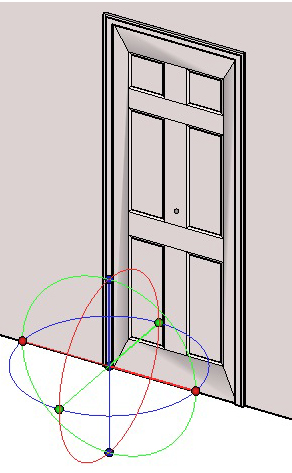
The door with theaxis moved to thebottom left corner. |
Simple animations, like the opening door that you will be doing shortly, can be accomplished easily using the Keyframe tool, while additional methods are also available and will be covered by subsequent tutorials. In all cases, you first need to set up the model you will be animating. For this tutorial, either open the sample file "Swinging Door Base", found on your program CD, or build a simple door yourself. If you do, change its name to "door_geometry" so that the illustrations we show agree with those you will be observing on your screen. The door in our file is as shown to the right. If you build it yourself, it will probably be a lot simpler. In spite of this, all the animation values and settings you will be generating for this tutorial will look exactly the same regardless of which door you use. As a matter of fact, you can also do what is standard practice among animation professionals: set your animation with the simplest door possible and then transfer these settings to a more elaborate design of a door.
You will first prepare your door to rotate as you want it for this tutorial.
Select the Edit Axes tool from the Modeling workspace and click on the door.
Notice that the door highlights in orange and a transform widget appears at the basis of the door where the axis currently is placed.
-
Turn on Snap to Point (
 ).
).
-
Click at the center of the transform widget and move it down to the front, left corner of the door.
Your door is now ready to start the animation process. Change workspaces to Rendering/Animation.
-
 With the Keyframe tool active, click on the door.
A blue line is displayed at the left end of the Animation Time Line palette. This represents a key and indicates that the door is now animated.
The Animation Score section of
the Animation Editor palette.
-
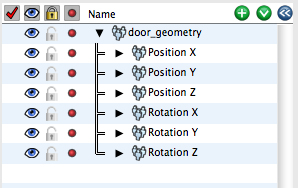
From the Palettes menu, open the Animation Editor palette. Notice the "door_geometry" object is listed. Click on the arrow before the name to expose its contents. Observe that several attributes are listed. Recall that these attributes are called tracks and are generated by default when applying the Keyframe tool.
-
From the Palettes menu, open the Animation Options palette and in the Timing tab, make sure the Time Display Format is set to Seconds.
-
In the Animation Time Line palette, move the current time forward to 2 seconds.
-
Make sure the Auto Keyframe (
 ) button is on.
-
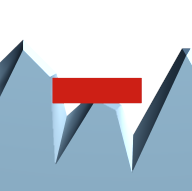
 With the Transform tool rotate the door 90° clockwise about the Z (vertical) axis as shown in the example.
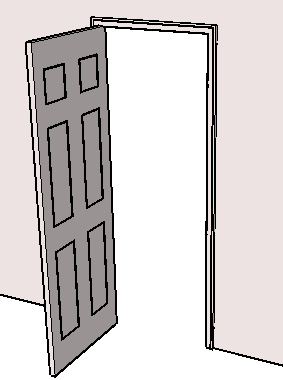
Rotating the door.
A clarification about the sign of the rotation is in order. form•Z gives you the option to specify whether clockwise or counter-clockwise is considered a positive angle.
This is done in the Project Settings: Working Units dialog (Angle Options tab) invoked from the File menu. By default, positive is counter-clockwise. Thus, assuming you did not change the default setting, the rotation you just did was negative 90 degrees.
Because Auto Keyframe is on, any changes made to an animated object are saved at the current time. In this case, another keyframe is automatically made to save the rotated new position of the door.
To test this, grab the current time marker in the Animation Time Line palette and drag it left and right. Notice the door swings open as the animation moves forward in time.
-
From the Palettes menu, open the Animation Options palette. In the Preview tab under Entity Preview, make sure Show Keyframes is off. You may now close the Animation Options palette.
-
In the Animation Time Line palette, hit the Play button and observe the door open and then stop. It stops as soon as it reaches 2 seconds and stays open as time continues to move all the way to 10 seconds, at the right end of the time line. Then it cycles back to 0 seconds and starts again. At any time, hit the Stop button.
Note that, had you not turned off Show Keyframes, the image of the door would be shown dimmed at the positions of the two keyframes. Now that this option is off, the keyframes are not shown.
Animation Editor palette
Next, you will adjust the animation curve (the graphic representation of the track for Rotation Z) to make the motion of the door more realistic. Currently, the motion looks mechanical as it opens at a very constant speed. With a little adjustment you will make the door swing more naturally. You can also make the door appear to slam open or perhaps to appear as though it is blowing in the wind. You will do all these adjustments working in the Animation Editor palette.
-
From the Palettes menu open the Animation Editor palette. The door object name and the tracks it contains should be listed in the upper left area of the palette and a graph should be displayed to the right. If the tracks are not listed, click on the triangle in front of the door name to expose them.
-
Above the graph, there is a row of buttons. Click on the Fit Visible button (
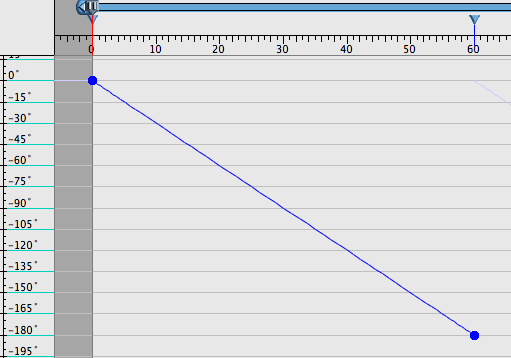
 ), which is the third from the left. The graph is adjusted to occupy the graphic area, as shown below. The graph consists of a single straight line corresponding to the Rotation Z track. It is oriented diagonally, which represents the constant speed with which the door opens, as you observed earlier.
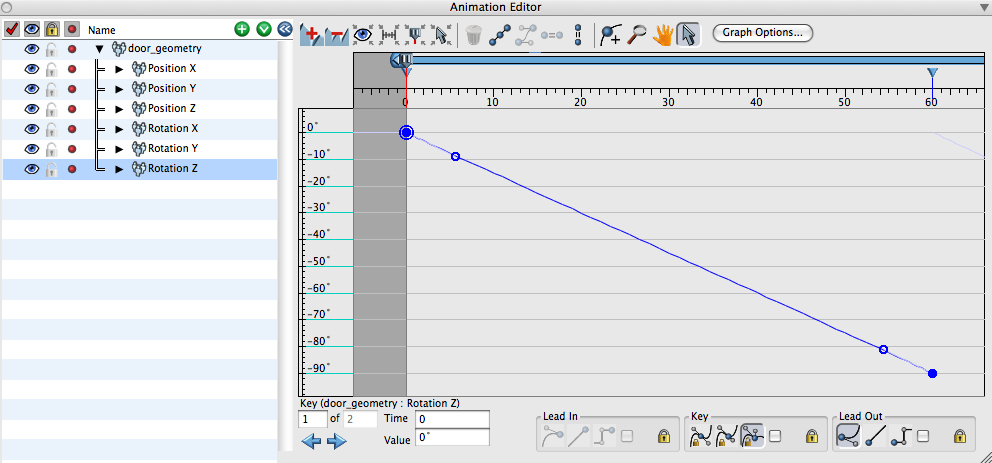
The Animation Editor palette.
The remainder of the tracks (Position X, Y, and Z, Rotation X and Y) are currently graphed in the window as single dots on the left vertical axis, which means they only exist at time 0 and they have not been animated. You may actually make their graphs disappear by toggling off the eye symbols (  ) displayed next to them, in the second column of the list.
-
Click on the Rotation Z track to highlight it.
The graph of Rotation Z in the Animation Editor palette shows all the keyframes. How the data is interpolated between keyframes is controlled by the leads attached to each keyframe. The leads are drawn as a line with a circle at their end and are coming out of both sides of a keyframe. The lead on the left of a keyframe is called the lead in while the lead on the right is called the lead out.
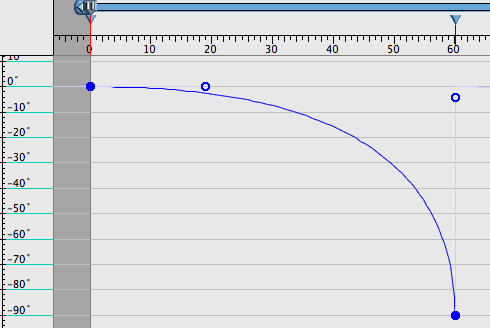
The Animation Editor palette graph,
after moving the lead in of the second keyframe down.
For the Rotation Z of the door, experiment with the positions of the leads to see how they affect the motion of the door. For example, grab the lead in of the last keyframe and drag it up so that it is some distance vertically above the keyframe. This will make the animation curve turn almost vertical as it is drawn into that second keyframe. Also drag the lead of the first keyframe to the 0 line. To confirm the effects of these changes, minimize the Animation Editor palette and play the animation from the Animation Time Line palette.
Now that you have played the animation, you must have noticed that, while a diagonal orientation of the graph represents even speeds, portions with more or less vertical orientations represent fast speeds and portions with horizontal orientations represent slow speeds. When reading the graph of a track, to figure out the behavior it represents, compare the distance traveled on the vertical axis relative to time, the distance traveled on the horizontal time. The longer the vertical distance, the higher the speed.
Next, you will make the lead into the second keyframe flat. This will gently ease the motion into that position.
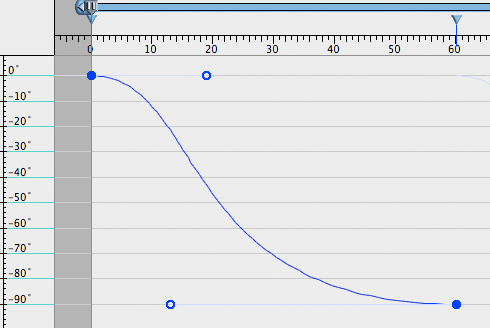
The Animation Editor palette graph,
after flattening the second keyframe.
-
Open the Animation Editor palette and highlight the second keyframe of Rotation Z.
-
Click the Flat (
 ) button.
Note that the lead in is positioned directly left of the keyframe. The lead handle can be stretched further left to make the lead in even flatter.
-
In the Animation Time Line palette, click Play. The door starts to swing out and gently comes to a stop. Flat leads will give objects a smooth and fluid motion.
Adding keyframes
Next, you will make the door appear to be abruptly pushed open, slam into the wall, and rebound slightly. You will do this, by adjusting the value in the existing keyframe and by adding one more keyframe.
First, adjust the existing keyframe to make the door slam into the wall. Logically, the door would be at roughly 180 degrees when it strikes the wall. You will make the adjustment to the rotation angle directly in the Animation Editor palette.
-
Open the Animation Editor palette and click on the Zoom out (
 ) button (second from left) as many times as necessary until the -180° mark is displayed on the vertical axis.
-
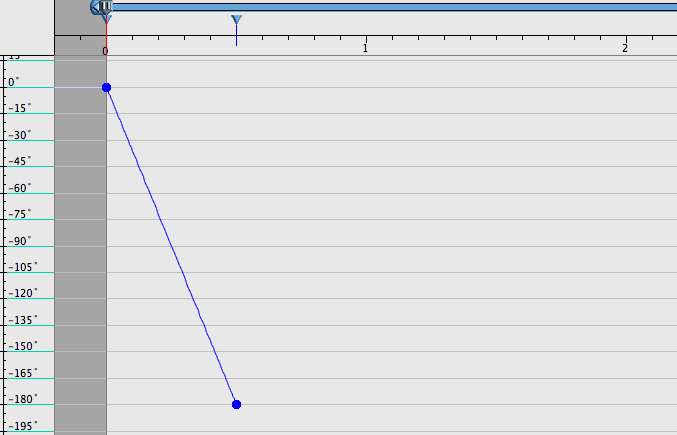
Now drag the second keyframe vertically to the -180° line. The time remains the same, which is 2 seconds. This will cause the door to open by 180° and slam against the wall.
You will next adjust the lead out of the first keyframe to imitate a sudden opening of the door. This can be done by making the lead out for the first keyframe linear.
-
Click on the first keyframe. Below the graph in the Key section of the Animation Editor palette, locate the Lead Out group and choose the Linear option (
 ).
).
Notice that the lead has disappeared from the first keyframe. The lead out for the first keyframe is basically pointing at the end of the lead in for the second keyframe. Drag around the lead in for the second keyframe to observe the behavior of the graph.
To adjust the lead in for the second keyframe to be Linear, use the same technique as above.
The Animation Editor palette graph,
after making both keyframes linear.
The Animation Editor palette after the
second keyframe is set to .5 seconds.
-
Highlight the second keyframe. Below the graph in the Key section of the Animation Editor palette, locate the Lead In group and choose the Linear option (
 ).
).
-
Click on the Fit Visible (
) button and observe the perfectly straight line connecting the two keyframes.
Play the animation. With the second keyframe set to a value of -180° and a time of 2 seconds, the door appears to open rather slowly. Thus you will make some more adjustments, next.
-
In the Animation Editor palette click on the second keyframe.
-
Change the Time field to 0.5 and observe how it changes the graph.
-
Play the animation. It appears as if the door swings open and then sticks to the wall.
Next, give the door a little rebound, so that it bounces off the wall. This requires the addition of one more keyframe.
-
In the Animation Editor palette,
activate the Insert (
 ) button and click on the space after the second keyframe, to add one more keyframe.
-
Highlight the second keyframe and click the Linear option (
) in the Lead Out section. This makes a linear lead out from the second key frame.
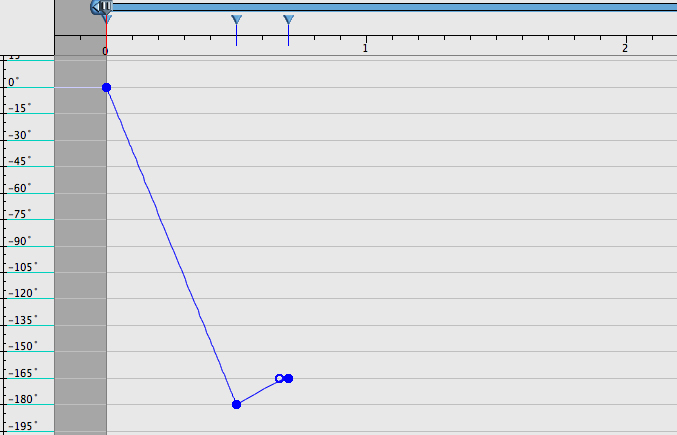
The Animation Editor palette after adding
the third keyframe at .7 seconds.
-
Set the Value of the third keyframe to -165° and the Time to 0.7 seconds.
-
Adjust the lead in of the third keyframe to be flat. To do this select the
third keyframe and then click on the Flat button (
).
The graph should now appear as the one shown to the right.
-
Play the animation and observe the motion of the door.
The sharp point formed by the line going into and out of the second keyframe is what gives the motion that abrupt reversal in direction. Since the angle of the outgoing line from the second key is a little less steep, the speed of the door on the rebound will be a little slower. The speed decreases from there until coming to a soft stop. The gentle end is due to a flat lead in on the last keyframe.
A door swinging in the breeze
You will next make the door appear to swing in the breeze. While there are many ways this can be done, a simple method will be used in this tutorial.
-
Select the first keyframe in the Animation Editor palette and change the Value field to -15.
-
Make the lead out of the first keyframe curved. You do this by highlighting the first keyframe and selecting Curved (
 ) from the Lead Out section under the graph. This causes a lead to appear.
-
Click on the Flat button (
) above the graph to make the lead flat, then drag that lead further right to make its curve still flatter as it exits the keyframe.
-
Change the last keyframe to a Time of 4 seconds and a Value of -15. It should have a curving lead in. Make it Flat. It should be roughly a mirror image of the first keyframe.
-
Set the second keyframe to a Value of -60 at a Time of 2 seconds. Also make this keyframe have a curved lead in and lead out that are Flat.
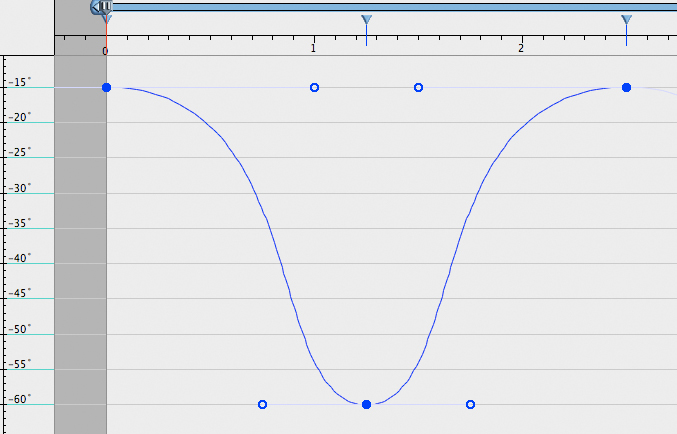
The graph should now look like the graph below right. If not exactly, make additional adjustments by manually moving some of the leads as necessary to roughly match the graph in the example.
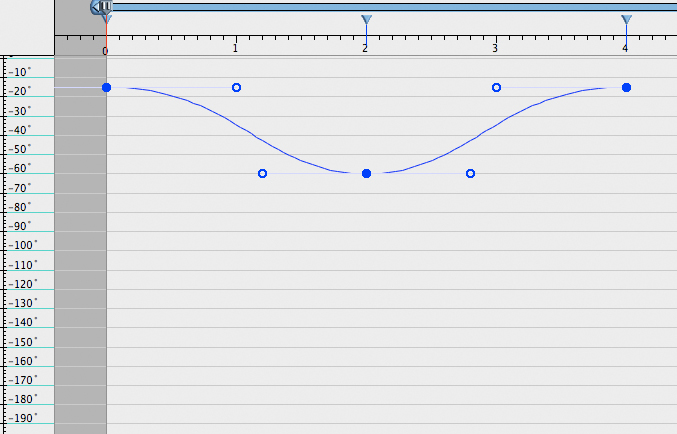
The Animation Editor palette graph
of a track that makes the door swing.
Click Play in the Animation Time Line palette to review the animation.
The door should gently swing partially open and gently swing back.
To make this door constantly flap in the breeze, the animation can be made to repeat.
-
In the Animation Editor palette, right click the Rotate Z track and select Track Options... Click the button labeled After and, from the Type pop up menu, select Repeat Normal.
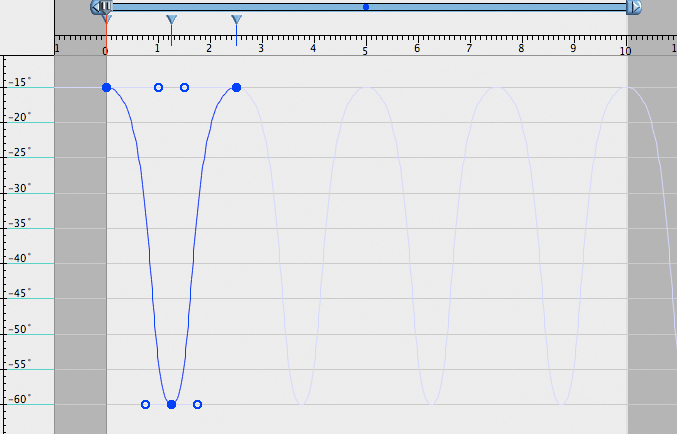
The Animation Editor palette graph after the
selection of Repeat Normal and Fit Animation.
The Animation Editor palette graph of a
track that makes the door swing.
-
Click on the Fit Animation (
 ) button and observe how the graph repeats itself and covers the complete span of 10 seconds.
-
Play the animation.
When you played the animation, you noticed that the door swings continuously. After 10 seconds it returns to time 0 and starts all over again, thus going continuously until you hit Stop.
You must have observed that when it cycles back to 0 from 10 seconds, the motion is not smooth. It jumps from the open to the closed position rather than closing smoothly, as it does the other times. This is because
the 4 seconds do not divide exactly the 10 seconds. To correct this we need to either extend the 10 seconds (say to 12) or to reduce the 4 seconds (say to 2.5). In this utorial we shall do the latter.
-
In the Animation Editor palette, highlight the second keyframe and in the Time field enter 1.25.
-
Next, highlight the third keyframe and in the Time field enter 2.5.
The Animation Editor palette graph after the
selection of Repeat Normal and Fit Animation.
Note that we could also click and drag these keyframes to the suggested time positions, but it is more accurate to just type the desired values.
-
Click on the Fit Visible (
) button. Your graph should be as shown in the example.
-
Click on the Fit Animation (
) button. Note how the position at time 0 matches exactly the position at time 10, which will allow the door swing to transition smoothly.
-
Play the animation.
