Animate Entities
This tool creates a single animated entity from a series of objects, views, lights, or animation groups. Each static entity in the series is used to define a keyframe of the animated entity.
When creating an animated view, the original views must be of the same type. Other parameters of the view can be different (spin for example). The different values will be represented in the keyframes. When creating an animated light, the original lights must be of the same type, but other parameters may be different (as with views). When creating an animated object and the picked objects are of different types, the first object's type will be used. Plain objects must also be geometrically and topologically similar, but may have different attributes and parameters.
Before using the tool, create the desired entities and edit their positions and parameters. It is recommended that the entities be created by making copies to be sure that they are all of the same type. The tool is then applied using the prepick selection method. With the Pick tool active, select at least two entities (object, lights, views, or animated groups), then activate the Animate Entities tool and click anywhere in the graphics window.
No dialog can be invoked directly from this tool, however a dialog is presented after the click with the Animate Entities tool. Depending on what type of entities have been selected, one of four variations of a dialog is invoked, namely: the Animate Object Options dialog, when objects are selected; the Animate View Options dialog, when views are selected; the Animate Light Options dialog, when lights are selected; and the Animate Group Options dialog, when animation groups are selected. Some of the options in these dialogs are common and some are unique to specific dialogs, as follows:
The Animate Object Options dialog
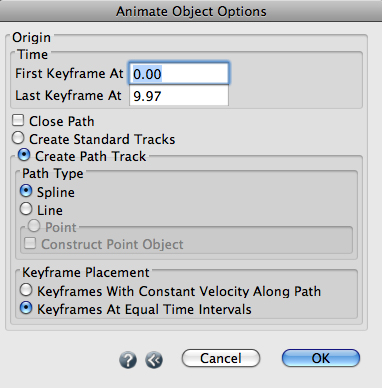
The Animate Object Options dialog.
Origin: This group contains the remaining options of the dialog, all of which relate to the object to be animated, which occurs through its origin.
Time: This group of options determines when in the animation period the entity will be animated.
First Keyframe At: The value entered in this field determines the time of the first keyframe.
Last Keyframe At: This value determines the time of the last keyframe.
Close Path: When this option is selected, the path object will be a closed curve, otherwise an extra keyframe will be added such that the animated entity returns to the first keyframe.
Create Standard Tracks: When this option is on, the standard transformation tracks for the object are created, instead of a path track.
Create Path Track: This option will create a path track (instead of X, Y, Z tracks), to control the entity’s position. The path will pass through all the originally selected objects.
Path Type: Path tracks can be of different types.
Spline: When this option is selected, a spline object is created for the path track.
Line: When this option is selected, a vector line object is created for the path track.
Point: When this option is selected, a point is used for the path. In this case, a path track is not actually needed, so it will not be added to the entity by default. If desired, it can be added with the following option.
Construct Point Object: Select this option to explicitly add a new point object to the project and use it for the path track.
Keyframe Placement: This item determines how to place keyframes in time along the path.
Keyframes With Constant Velocity Along Path: When this item is selected, keyframes will be placed for the path track such that the new entity moves at a constant velocity over the entire path.
Keyframes At Equal Time Intervals: Keyframes will be spaced equally in time between the start and end time.

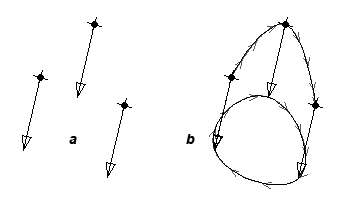
(a) Original objects for Animate Entities operations, using Create Path Track: Spline and Close Path (b) off and (d) on.
The Animate View Options and Animate Light Options dialogs
The Animate View Options dialog is shown below. The Animate Light Options dialog is not shown as it is identical to the former except that one of its sections is labeled Location rather than Eye (see below).
Create Standard Tracks: When this option is on, the standard transformation tracks for the view or light are created, treating the entity as a whole, rather than separating the eye or the location and the center of interest.
Time, First Keyframe At, Last Keyframe At, Close Path: As for the Animated Object Options dialog.
Create Separate Tracks: When this option is on, separate tracks are created for the eye or location and the center of interest.
Eye/Location or Center Of Interest: The Animated View Options and Animated Light Options dialogs contain two main sections whose content is identical, except for their titles. They are labeled Eye and Center Of Interest for the views and Location and Center Of Interest for the lights. The options in both are as follows:
Time, First Keyframe At, Last Keyframe At: As for the Animated Object Options dialog.
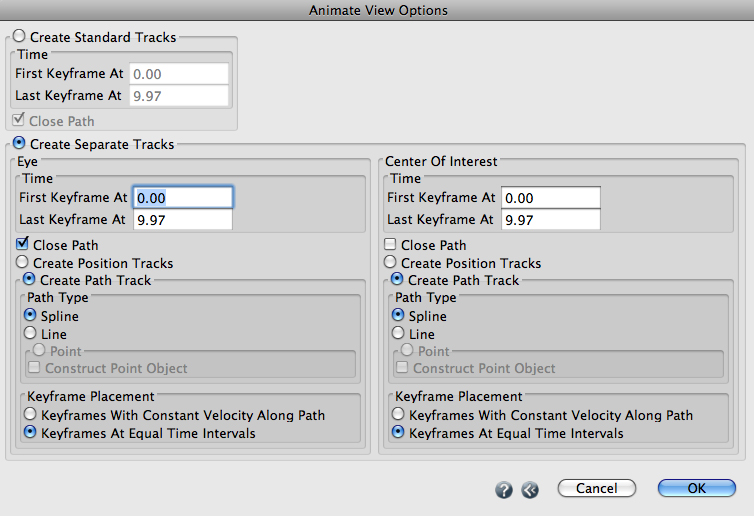
The Animated View Options dialog.
Close Path: If Create Path Track is selected, the path object will be a closed curve, otherwise an extra keyframe will be added such that the animated entity returns to the first keyframe.
Create Position Tracks: When this option is on, separate X, Y, Z tracks will be created for the new entity’s position, instead of path tracks.
Create Path Track: When this option is on, one path track will be created to control the entity’s position. The path will pass through all the originally selected eye/location or center of interest points.
Path Type: Path tracks can be of different types.
Spline: When this option is on, a spline object is created for the path track.
Line: When this option is on, a vector line object is created for the path track.
Point: When this option is selected, a point is used for the path. In this case, a path track is not actually needed, so it will not be added to the entity by default. If desired, it can be added with the following option.
Construct Point Object: Select this option to explicitly add a new point object to the project and use it for the path track.
Keyframe Placement: The options in this group are as for the Animated Object Options dialog.
For newly animated objects, rotation tracks will also be added such that the entity’s rotation is keyframed in alignment with the previously positioned copies of the object.