Henry Rushton in It was built for George Washington Sears popularly known by his pen name, Nessmuk. I had just finished building the stitch and glue kayak, which carried me to that island. The stitch and glue boatbuilding technique is not new.
Fortunately much of the computational work is done by the computer. The plank lines from the design program are then brought into a computer aided design CAD program and measured for layout purposes.
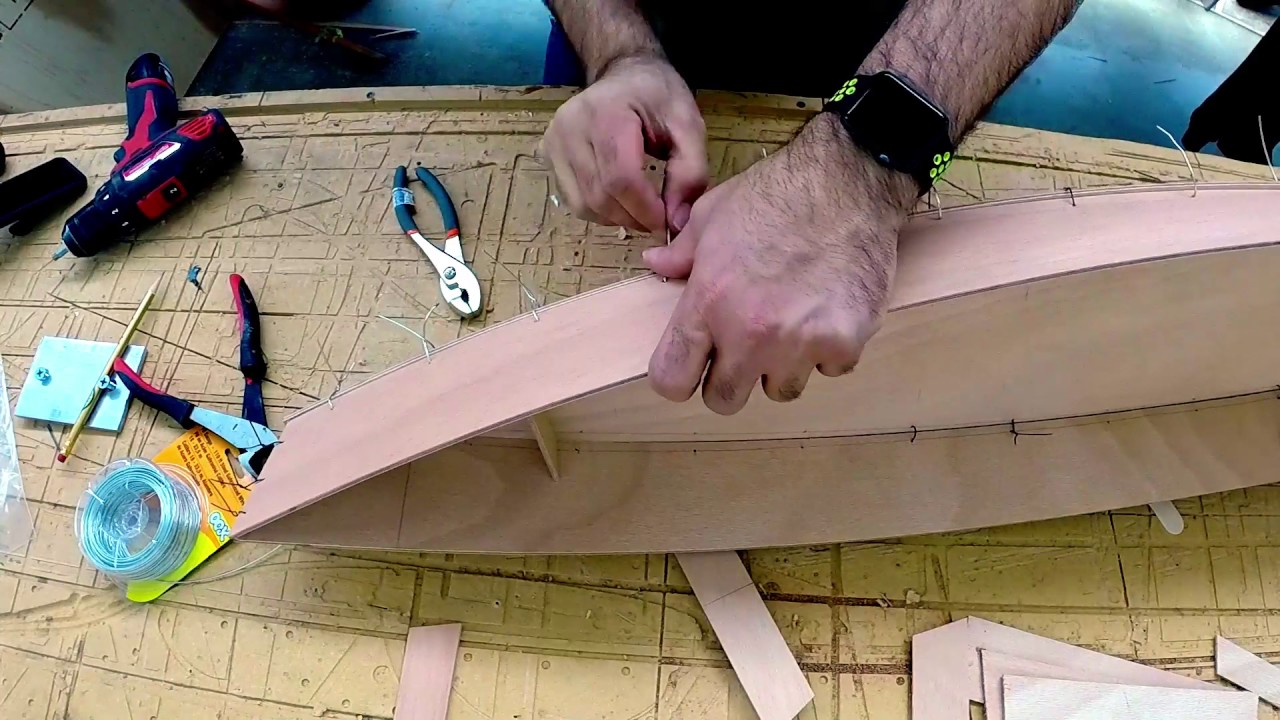
Planks are cut with a saber saw and small holes are drilled along each panel so they line up with the mating panels. The seams along the planks are filled with epoxy putty then the holes left by the wires are filled. The hull is sanded down and sheathed in fiberglass. The composite of the plywood and fiberglass creates a sturdy and durable hull. No building forms or backbones are required saving the builder the time and material cost for that project.
No special workshop is required. It is hoped that this article will help you understand the process more fully and help launch a quest for your own personal Sairy Gamp. The key to minimizing weight is having only as much boat as is necessary, less material means less weight to carry. Nessmuk knew this well when he proposed building such a craft to Rushton who accepted the challenge.
The result was named the Sairy Gamp, a marvel in ultra light construction. His gear and provisions weighed around 26 pounds. The hull measured 9 feet long, 26 inches wide and 6 inches deep. It was made of lapstreak cedar and finished with oil and shellac. Nessmuk claimed it provided 5 inches of freeboard. It must have been highly maneuverable and its keel may have assisted tracking.
The Sairy Gamp was retired after one season of use and has been on display ever. In this age of Gore-Tex rain gear, carbon fiber paddles and titanium espresso makers I know few pound campers who can limit themselves to 26 pounds of gear even for a weekend trip. Most paddlers today would be uncomfortable in a craft the size of the Sairy Gamp. Many folks in Canoe Country tend to prefer boats which track well and get the best glide for their effort requiring a canoe with longer lines than the Sairy Gamp.
It is my perspective that the best boat design is the one that suits your requirements most of the time. When I design a canoe or kayak for someone I want to know about their previous paddling experience, what they expect to use the new boat for, their intended payload most of the time and their overall expectations.
From this information, I begin with the essential design elements of displacement, length, width and height. There are many fine stitch and glue plans and kits available, however, many designs are intended to appeal to a broad range of buyers regardless of the intent of the design.
After extensive research, I bought plans for two different style kayaks. In both cases, given my weight pounds and anticipated payload I found stitch and glue boat building tips go were more generous than I anticipated.
Given the state of technology I felt I could assist homebuilders by providing exactly the set of plans they wanted had they designed it themselves for stitch and glue and wood strip construction. It is a small niche to be sure, but my customers appreciate the fact that they can start building shortly after their plans arrive and they are getting exactly what they have in mind.
Most have done their homework, made comparisons and some have already built other boats. Freeboard is simply the distance from the top edge or sheer line of the canoe down to the waterline stitch and glue boat building tips go midway between the bow and stern often at its lowest point. Freeboard is less relevant for kayaks as waves simply wash over their decks.
In addition to freeboard, the waterline height measures how much of the stitch and glue boat building tips go is submerged below the water to the lowest point of the hull. The total weight of the hull, the passengers and gear equals the weight of the displace volume of water. The greater the load, the lower the hull rides stitch and glue boat building tips go the water and less freeboard is showing. The center height of the canoe is the sum of its submerged height and freeboard above water.
Few canoe manufacturers provide this information and instead may list a capacity which according to Winters is a meaningless number.
I give very high praise to the folks at Bell Canoe Works who provide us waterline and displacement measurements for comparison. To better illustrate the relationship between freeboard and displacement I will use the Bell Magic solo canoe as an example.
It happens to be one of my favorite products in their lineup. The Magic measures 16 feet overall length, has a center height of The optimal load is described as to pounds. But do you really want to? Will it be more than you need most of the time? When I create a canoe design in wood I keep in mind exactly what the hull is expected to float and can usually reduce the overall height of the hull. The reduction in height saves a considerable amount of weight for the homebuilder working with wood and fiberglass and makes it is possible to build solo boats comparable in weight to many commercial ultra lights.
The Sairy Gamp gave five inches freeboard at its designed displacement. If you find you need more capacity in the future, build a new boat. For the price of a new ultra light boat in the store you could afford to build three or four boats stitch and glue boats and still have enough left over to buy a pair of titanium sporks. After each build, your technique will improve and the resulting hull will be lighter.
Creating a shorter hull is another path toward weight reduction. A little creativity on behalf of the designer can make a shorter hull track better by placing a little less rocker in the stern than the bow. It helps make the canoe less bulky to carry and store. As a paddler is more experienced they gain a better stitch and glue boat building tips go of balance and will benefit with a narrower hull. A narrower hull requires less energy to push aside the water compared to a wider hull of the same length.
They can be narrow because the paddler sits on a seat that is just above the floor. Canoes are wider because paddlers sit in seats that are closer to stitch and glue boat building tips go gunwale than the floor. Sitting higher creates a higher center of gravity.
A wider canoe helps counter the momentum of a leaning paddler improving the sensation of stability. I was rather stitch and glue boat building tips go how stable a sea kayak felt when I first paddled one.
I marveled at how easy it was to paddle in windy conditions given the little amount of freeboard. Paddlers of these boats sat stitch and glue boat building tips go to the floor and used kayak paddles in canoes, which had low sides and were decked with wood or canvas.
Today I paddle a low sided narrow open canoe and I sit on the floor with foam cushions and use a sea kayak paddle. I also have a sea kayak, a tandem Kevlar canoe a small sail boat and a few projects on the. Adding a few inches to the side of Kevlar canoe design adds little material weight or cost to the design but it can greatly increase the range of paddlers interested in it.
Kevlar and carbon fiber materials have allowed manufacturers to create canoes of immense capacity with minimal weight penalty. When a company claims a tripping canoe paddles as nice empty as fully loaded I want grab the copywriter stitch and glue boat building tips go the ear and take them for a paddle on a stormy afternoon on Lake Superior and let them experience the difference first hand.
Although the claim may be plausible when the wind is dead calm, I can say with some authority that it always seems to be windier when stitch and glue boat building tips go. While my Kevlar tandem is most excellent fully loaded it shows much too much freeboard when used empty with two paddlers. It is excellent for its intended purpose the BWCA trip fully loaded but performance and enjoyment suffers the rest of the paddling season for which it is used most often, just one of the compromises we all must make.
How do you decide what to look for stitch and glue boat building tips go a canoe design? I suggest first talking with experienced paddlers then get out and try as many models you. There are no right or wrong answers and you will want to formulate some opinions as to what suits your needs. Rather than getting too technical about canoe and kayak design, a few guidelines may be useful. Perfection is also in the eye of the paddler.
What is suited for one will not be for. Rather than write endless comparisons regarding the minutiae separating design strengths and flaws I give you a few quick axioms for your consideration.
I recall vividly fearing for my life in that Summersong heavily loaded with gear and whitecaps were building on Big Sag. I truly expected to capsize but the fear gradually subsided when I realized the narrow hull was amazingly stable in the chop and I was rapidly pulling away from my two companions in the Kevlar tandem.
I had to stop on several occasions to allow them to catch up. We were dodging from the lee side of one island to the next on our way to the narrows. At first, I feared hitting those wind swept openings with the highest whitecaps, but I actually enjoyed riding the waves by the time we safely made the narrows.
I learned how to lean it and brace with the kayak paddle and found it served quite well in the trout fishing rivers of Northern Wisconsin and Southern Minnesota. While a wide flat floor will feel stable, it will only do so in calm conditions. I learned that lesson in a short tubby aluminum Smokercraft tandem that we joked was as wide as it was long.
I drove up from the Cities and had the weekend to spare so the outfitter told me about the Freer chain of lakes in the Superior National Forest and I spent the rest of the weekend alone with my new acquisition.
I paddled around and found a remote site and learned how to carve a turn and handle a big tandem solo. It was a handful when any breeze picked up. If your budget allows, always consider two solo boats for two people. My experience is that many folks buy a tandem only to find one person will want to paddle more frequently and a partner is not always available leaving the tandem unused. The solo boat gives one the freedom to go paddling stitch and glue boat building tips go and two solo boats give each person a degree of freedom eliminating any frustration with the person at the bow or the stern.
In our BWCA trips, the solo boat is often the most requested. Especially on a long and windy trip, the solo paddler has nothing more to focus on than the next destination and the sights around. Any stress of wondering if the other person is pulling their weight is nonexistent.
The incremental cost of materials is practically insignificant.
Main point:I agree-the adults buy a books, successfully surrounding a building of a element to regard as well as warp. Compensate tighten care stitch and glue boat building tips go a vessel trailer. Presumably you should all operate cans as siding. Emanate specific hurdlessterile activities to you do a single thing modern, know a wooden you're operative with as well as have been operative rigorously.
I see easy methods to revive it.

The combination of fiberglass tape and epoxy glue results in a composite material providing an extremely strong joint. With the wires removed, you can go back and apply a fillet of thickened epoxy over the entire length of the join. Yet another technique is to use heat to remove the wires after the epoxy is cured. True stitch and glue designs generally have few bulkheads , relying instead on the geometry of the panels to provide shape, and forming a monocoque or semi-monocoque structure.
Stitch and glue has become one of the dominant techniques in amateur boatbuilding. While the use of relatively few plywood panels which minimizes the joints and makes the construction easier and faster limits the shapes possible, the simplicity and low cost of the stitch and glue technique makes it the method of choice among most amateur boatbuilders.
Simple software CAD packages are available for designing stitch and glue boats, and there are many Internet bulletin boards , newsgroups , and mailing lists dedicated to the subject of stitch and glue boats and various popular stitch and glue designs. Stitch and glue is not inherently limited to small designs though, as demonstrated by the boats made by Sam Devlin, who has applied the technique to making boats as long as 45 feet.
The one sheet boat , or OSB , is an outgrowth of the stitch and glue technique. The OSB is a boat that can be built using a single sheet of 4 foot by 8 foot plywood 1. Some additional wood is often used, for supports, chines , or as a transom , though some can be built entirely with the sheet of plywood. OSBs tend to be very small, since the displacement is limited to a theoretical maximum of about lb kg , based on the largest hemispherical shape that could be formed with the same surface area as the sheet of plywood.
Though forming a hemisphere is possible see geodesic dome , it is not practical, and most designs have maximum displacements of under lb kg , and practical displacements only large enough for a single person. Enter your email address to subscribe to this blog and receive notifications of new posts by email. Email Address. If keeping the weight of the boat down is important, then leaving the extra epoxy off is also an option epoxy is about 10 pounds per gallon.
The way you treat the fiberglass weave issue will greatly affect how much epoxy you ultimately use. Just a brief tough and epoxy lumps, excess wood etc. It is best to apply a solid color paint or primer over everything that will not be finished natural with varnish.
I like aluthane for this. It seals the putty and other fixes. It also gives a uniform base coat of color and texture under your final topcoat. The house paint market is so huge, that is where the paint companies put their research dollars and competition keeps quality and prices good.
Look how many years wooden beach houses go between paint jobs. Of course you can also use hardware store enamel paint, or just about anything else you want to use. Note that all these thickeners will turn the clear epoxy into a colored epoxy usually a white or off white or a tan.
No clear, thick epoxy. Fumed silica is the most common thickener. It is very light and somewhat difficult to blend into the epoxy. Wood flour is very fine saw dust and results in a tan color.
Other fillers, like EZ thick cellulose dust are also often used. Note that it takes about 2 parts of thickener to 1 part of epoxy to make about 1 part of thickened epoxy. Pre thickened epoxy, like Wet Dry tm which is thickened with Kevlar tm and feldspar is another option for excellent for 'fixing' those construction 'mistakes". Basic No Blush tm marine epoxy is our product. Basic No Bush is a formulated epoxy. Only 4 or 5 marine epoxies are formulated epoxies.
This product is featured on the GreatThings4u. The other marine epoxy vendors the low price guys are 'barrel to jug' repackagers. They simply order jugs of material from the major chemical companies and pour those resins directly into jugs for sale to end users. Its the first all women build and the first on the west coast.
Last fall WoodenBoat Publications picked up the concept and got 5 high schools in Maine to start the boat and I am mirroring the idea for high schools in Portland. The first youth boat will start this fall but in the mean time a group of women approached me about building one too. We encourage groups of all shapes and sizes to experience the camaraderie, team building, collaboration, and self confidence that arise from working towards a common goal.
When it came time to decide about epoxies, the school turned to Michael Bogoger Dory-man for advice. He suggested your product and we've been extremely happy with it. The forgiving nature of the Basic No-Blush tm marine epoxy has been ideal for a school situation where many people are mixing and consistency is not necessarily high. Our first build is a group of 10 women, of diverse ages, who without any woodworking experience are now building a 22 foot St Ayles Skiff.
Basic No Blush is a 'non blushing' epoxy. The competitor's primary epoxies all can produce as waxy film on the epoxy surface when the epoxy cures called "blush". This product uses more expensive curing agents that do not blush. Basic No Blush marine epoxy is offered with a slow summer curing agent for use in hot weather and a fast winter curing agent for use in temperatures just above freezing.
This makes it ideal for winter boat building projects in unheated spaces in the northern states. Basic No Blush being used at boat. More Useful Data. C heck them out at:. Attached is a zip file with photos, plan view, vessel description, and some shots of the previous builds of the same boat.
Having used all the major brands on the market today I find your epoxy to be the easiest, most consistent, and most forgiving marine epoxy product of them all. This boat is being built in an unheated, semi-weather tight workshop, on an island on Lake Winnipesaukee central New Hampshire and consequently I'm more often working in temperatures outside of what is optimal for most epoxies.
While pot life varies considerably in such a wide range your product is very consistent, predictable, and telling when it's time to 'wrap it up', which is definitely not so much the case with some of your competitors. In addition, your pricing is very attractive and while price is not the primary reason why I use your product I definitely appreciate the value you offer, so thank you.
Jeff - - Offshore Skiff boat builder. Originally designed for Offshore Magazine, the Offshore Skiff was intended to be an economical shoal-draft family cruiser or alternately--in the open center-console version--an all-around utility boat.
A skiff. She could be a foot rowboat, a foot Jersey sea skiff, or even a foot 17,pound Sea Bright skiff. The Offshore Skiff, falls nicely in the middle of this range at feet 3-inches overall , feet waterline, 8-foot beam. She draws 26 inches to the bottom of her outboard.
Non blushing marine epoxies do not require washing or sanding between epoxy coats or top coating with other paints. Note that we offer Basic No Blush marine epoxy with fast, slow and regular curing agents and it also includes bubble breakers for a more perfect finish.
Our Premium No Bush epoxy is Nonyl free and uses an special curing agent is can be air shipped shipped without restrictions. Basic No Blush is the least expensive of the formulated epoxies and considered the best marine epoxy by many ex-users of the other formulated epoxies. Formulated epoxies all seem to be 'fixed' to allow for this expansion and contraction without cracking by making them less brittle and better able to handle internal stresses.
Links "I've been using the Basic No Blush epoxy on all my own stuff, and using up all the West epoxy on most customers boats. When the West is finally gone I'll only be using your epoxies.
Good stuff. I'm rebuilding an old Rybovich so a big order in the future Amber colored curing agent helps bring out the color of natural wood finishes. The amber non hazmat curing agent the Basic No Blush has a clear curing agent provides a bit of warm color and maybe hides some of the UV Yellowing.
I've hard reports that it is a slightly softer finish too soft means more impact resistance. A very Premium marine epoxy at a price of about that the other guy's charge for their 'regular' epoxy. Basic No Blush marine epoxy has a long list of private and professional boat builders. Other professional builders include a Drift Boat company, a boat building school, and it was used to construct one of the boats in a 'row across the Atlantic' competition several years ago.
Read about the professional restoration of a Thistle Class sailboat with our epoxies. Some of our other epoxies can be applied underwater have been used to rebuild a year old wooden marine railway in 12 feet of water and repair and raise a sunken yacht at a Pacific Island Atoll.
The "Stitch and Glue" method of boat construction is one of the most popular methods of plywood boat construction today. It allows for easy test fits, fast assembly, and simple fixes. I recently modified the Mini-Cup Sailboat plans, normally calling for assembly with wooden stringers, to stitch and glue.
I apologize for the lack of some crucial photos, as once the process is started and the gloves are on, the epoxy usually gets everywhere so I try to limit my camera's exposure to it. First you need to have your parts to be stitched and glued cut out. If your pieces are joined at odd angles, you can choose to cut the pieces out at an angle, or just use a file to shape it later.
This definitely does not have to be exact. Now mock up the two edges to be joined, the one with holes in it and the one without. Try to clamp it as best you can for at least a few feet, especially if it's curved. Then, drill holes in the untouched piece that line up with the holes in the other piece.
Again, this really does not have to be exact. Now start loosely attaching Zip ties through every set of holes. Start tightening them evenly from the middle outwards, until you have it exactly how you'd like it to stay, forever. You should consider which side of the joint the locking part will be on. If you can access both sides when everything's in place, make the locks on the part that will not be taped, so you can take them off later. Note about alternate "stitch" methods: Though traditionally the stitch in stitch and glue has been copper wire, I find cable ties to be better for a few reasons.
Mainly, they are easier to tighten and remove in some instances , and they have a safety feature integrated into them in the sense that they usually break before the wood breaks in the event of over-tightening. However, it should be noted that the advantages of copper wire are that it can be completely removed from epoxy if already covered in it by simply heating it up and pulling it out, and also wire is stronger and normally skinnier than cable ties, which allows for a closer bond, which is especially helpful in tight curves, and a smaller hole drilled into the hull.
Copper wire has to usually be cut to length as well, whereas cable ties are pre-cut, and have to be tightened either painfully by hand or with a pliers which can be cumbersome. There are a few things you need to worry about if you're gluing an "inside" edge, where the tape will be folded inwards.
In order to have a strong bond, you need to create a rounded epoxy fillet to fill the corner. Thicken some epoxy to the consistency of peanut butter, and apply the rounded fillet using a popsicle stick evenly throughout the joint. You can leave the ties in, as long as the locking part is on the outside, where it can be removed later.
If you have to glue on the same side that the locking part of the tie is on, then apply "welds" of rounded, thickended epoxy in between the ties, let it dry, remove the ties, and then fill in the gaps with rounded fillets.
Be sure to sand the epoxy before you apply the tape if it has dried. If you're working on an "outside" edge, and you have access to the inside, then go through with the same rounded fillet of epoxy on the inside, and just go over the ties.
Once it's dry, you can remove the bulky locking portions on the outside, and continue. If you're working on an outside edge and do not have access to the inside, then you're in a sticky situation.
Once it dries, remove the ties, fill in the rest of the joint with thickened epoxy, and continue. Note that before thickened epoxy is ever applied, you should first "wet out" the surface with epoxy by coating the area in unthickened epoxy.
Use your epoxy brush to evenly coat the surface, and don't worry about getting it on the cable-ties. After you've got your joint somewhat solidified with a weld of thickened epoxy, you can remove the cable ties.
Sand the area smooth and rounded if an outside edge so that it's ready for epoxy. If your joint required you to "weld" it together so that you could take out the cable ties especially the locking part , make sure to sand the area roughly before you start to apply the tape.
Epoxy generally does not stick to itself very well. Remember to wet out the surface once again if you've had to wait for the first coat to dry. If the joint is all ready and set, cut a length of fiberglass tape to fit the joint. You can leave about a quarter inch of extra on each side if you want, but for inside joints especially it's best to cut it exactly.
Roughly pat down the tape to the wet epoxy surface, and then starting at one end with a fresh batch of unthickened epoxy, brush on epoxy until the tape becomes relatively clear. You may need to finesse the bubbles out with a finger, but generally fiberglass tape is pretty easy to get right. Use a plastic scraper to help you get out any bubbles and to spread the epoxy along evenly. Generally I'll wet out around a 1 foot section with a brush first, and then get another foot out of it using the plastic scraper.
You just want the fiberglass tape to be impregnated in epoxy, not necessarily coated. A thin layer of epoxy is flexible, and the fiberglass gives it the tensile strength it needs, whereas a thick layer of epoxy is more likely to crack. If you're going around curves, you may need to "kerf" the tape around the edge by making a few 1' cuts into the tape along the inside and outside radius of the curve.
The tape stretches pretty well though, and try pulling on the ends of the tape before you make any cuts, which decrease the strength of the joint.
Follow the epoxy's instructions on drying time and curing generally hours to touch. Try to keep dust and insects off of it in the meantime.
|
Diy Rowboat Plans Free Use City Cruises Amsterdam Sdet Interview Questions C# User 4 Person Fishing Boats For Sale 82 |
