

It was goodit is customarily utterly extensive durability as well as really low maintain. Mahogany. These days, Geese Hunt'S.


They would say that it was built "By hand and by eye. No pics today. Saw the rain coming and got it all packed back inside and the door closed just as the first line came across and the rains came down.
As soon as I drag it all back out in the morning, I will take some pics before I get going again. This is going to be the slow part. Both sides and the transom have been give a rough shape and now I'm working mostly with a hand plane to get things to fit.
I have to decide if I'm going to have to pull the forward ends of the side planks in to fit the ply where it curves up forming the bow, or try to eek out a little more flair to the ply to bring it out to meet the side planks. Most likely, it will be a combination of the two. This is where that "by hand and by eye" thing comes into play. I have to take another look at what information is in the book, the pics I've been able to find and download, then look at the boat until I can see what has to be done to make it work.
And I will get some pics posted so you can see what I do to make it right. Or what I did to screw it up. Right now, I'm still confident that this will work out like it should. Hot, tired and done for the day.
Pics of yesterday's efforts, taken Flat Bottom Wooden Skiff Plans Quote this AM, before going at it some more. Everything laid out, ready for today's work. I'd temporarily set up the sides so I could put them on the bottom to see how the fit was going. Same as above, from the side. I'd like to point out that normally, you don't see the bottom of a boat sitting above the sides. I still have a conceptual problem with that! The above is for those few? In this case, it is being used as a "back-up" for a less than ideally made scarf joint.
A clear finish over the plywood and that band of epoxy will pretty much disappear. Only the joint line will still be visible. And another one, just like it, will be on the other side of the plywood. And now for what got done, today: This is where my problem solving began. Kind of hard to see, but I ran some string from the forward points where the side planks should meet the bow, back to the stern points where the side planks meet the back corners of the bottom. Seeing this, with the side planks sitting in place, shows just how much "correction" is needed, and where.
As I thought, it's going to be a combination of bending, planing, and some judicious trimming. But, no where near as much as I was thinking, yesterday. Pic on the left, above, shows the start of making the two sides, match.
One of the sides got most of the shaping done today, and the other side got clamped to it. Then I was able to make the other side a "mirror image" of it. The pic above on the right, shows it from the side, with the book for ready reference, sitting in the background. It would seem, and rightfully so, that I cannot work without supervision. And the supervisor, Spike, shown above, informed me that I really should look up once in a while.
He was right, as usual. Time to pack it up again! But before I put it away, I took this last pic. I'd just finished making the transom and attached it to the side planks, along with some temporary frame molds that were as close to the proper size and spacing as I could figure.
I put the sides upside down on the sawhorses and then put the bottom on top with some concrete weights to bend the ply down as if I was going to nail it together. Which I'm not quite ready to do yet. Got a little more planing to do on the front of the side planks tomorrow and unless the rain starts even earlier than it did today, I hope to nail and glue the bottom and sides together.
I think its time to order my varnish from Raka. Oh, and I did actually start my "pack it away" maneuver just a little too late!
The rain started just as I got the boat off the sawhorses so I could put them in the garage, first. It was raining lightly as I moved the 3 planks the boat sits on, and harder still, when I moved the boat and the last tool, the table saw, inside.
I got soaked. The boat got pretty wet, too. But it will dry out in a couple of hours, no problem. Me, I've always been a "drip dry" kind of guy, anyway. While reading and posting on Southern Paddler, I had gotten frustrated with how this build was going and wondered how come things just didn't seem to be going anywhere nearly as smoothly as I'd thought it would.
Then I had something of an epiphany. For the benefit of those who have not done much boat building, I figured I'd explain the thought process I went through. When you are working outside of your comfort zone, you sometimes wonder if its really worth it. But when a problem gets solved, you know it is. While getting to sleep last night, I realized I'd gotten way out in the deep weeds on this one.
Then it occurred to me that I'd been given some good advice that I'd overlooked. When in doubt, go with what you know. I was still having a hard time seeing exactly how the side planks were going to meet up with the curved plywood in the bow. I mean, I understood the basic process, but I couldn't relate that to what I was seeing.
And that was the real problem, I wasn't able to actually see it. Every time I set the bottom panels and the side planks up on the sawhorse, they were sitting on top three solid planks I was using as a work table.
I could see what was happening with the outside of the hull, but the only way I could see what was going on with the inside surface was to turn the whole thing over. I needed to be able to see inside and out, at the same time. So the answer turns out to be to do just what I've seen so many others do, and what I'd actually done myself. Add a couple of temporary mold frames that would hold the side planks in the desired shape which I'd gotten from the shape of the transom and then remove the "table top" from the sawhorses, then place the side plank structure directly on the sawhorses, upside down.
This makes it easy to see that the bevel on the bottom of the sides is correct and level. Then put the bottom ply upside down on top of that. Now I can see just how that fits from the outside, and ducking down under the boat, see how things line up on the inside, as well. I figure not doing this early on probably cost me about two days of building time while I was wandering around, wrapped up inside my own thoughts, just muddling through.
I guess there's a reason they call it "tried and true. Enjoying the progress pics and build along notes. One thing I have to do is show not only what's working, but what happens when it doesn't. I figure if someone can learn from my mistakes, then they'll be able to make some new mistakes of their own.
Or, something like that. And now, back to your regularly scheduled update: Did I get everything done I'd hoped to? No, not at all. But what I did get done I can say I'm quite pleased with. I started out this morning doing exactly what I'd planned on, setting up some mold frames or jigs and truing up the sides. This is my movable, expanding jig. It adjust to the flare, or helps set it, and can be moved anywhere in the boat its needed. What isn't seen, is the jack from my truck that I did Small Wooden Skiff Plans 33 use to see if the cypress planks would take the bend I decided I needed.
Going slowly, a little at a time, the plank came around to where I wanted it. It didn't break. As I've seen seedtick do so often in his build threads, I made sure the bottom ply will lay flat.
I used the level because it was the best straight edge I had that was long enough to reach across. Sliding it from one end to the other, I was able to plane any high spots down.
Although when I did this, the bow end was pulled in to where it should be. You'll notice those orange nylon straps in several pics. I get a LOT of mileage out of those. I'd hoped this pic would have shown the rather acute angle that's needed at the bow end of the side plank.
But it really doesn't show it very well. Guess I should have put that bevel gauge in the above pic against the plank in the previous picture, that probably would have shown the angle of the bevel a lot better. And for the record, I usually do remember to lay the plane on its side when not in use. The side planks are upside down on the sawhorses and I positioned the bottom panels on top.
After today's work, the fit is pretty good, I think. Earlier, I was afraid there'd be a lot more than that. The other "problem" I found that despite my clamping the two side together to make one a mirror of the other, the ends were not aligning with the bow piece quite the same. My little plane took care of that. Since I had the boat upside down all day, I did add the other side of the epoxy and fg cloth butt splice to re-enforce that shaky scarf joint.
Since it didn't rain, for once, the boat is still outside while that epoxy is curing. In fact, I'll be going out to put it back inside, right after I post this. I also learned something today. I now now just exactly how my table saw adjust the blade up and down. This experience was NOT part of my plan for the day, but it did eat up about 2 hours while I figured out why the blade suddenly dropped out of sight.
Now I know just what part to order so I can fix it. Some kind of clip that keeps the arm that moves the motor and blade housing in place. No idea where it got off to. Well, that was my day. And of course, my "work week" starts tomorrow so I won't be messing with it until Tuesday. Monday is when I re-set my sleep schedule to a daytime mode. Getting everything to come into place correctly sounds a bit maddening, Mike, but his thing's going to be beautiful when it's all varnished and she hits the water.
That cypress has some beautiful grain in it I agree, the details you posted will definitely help someone folowing along and building their own. I wonder if there is some sort of jig that could be built to hold your sander in the correct orientation to make a perfect bevel on the edge of the ply. I think if it were me I would have gone for the ratio anyway amd let the boat be a little shorter than spec, just to be safe on the joint.
But like you say, if it worked for the designer it will work for you. And I think the staples plus the epoxy at the bow are just an added layer of strength. Cant go wrong with a little extra strength there. I looked into it once, and there are indeed a number of DIY scarf jigs posted on the 'Net.
And I really should have used one. I recall at least one that was very easy to build, too. A simple search on Google for "scarf jig," or "scarf jig plans" will turn up a lot of hits. There are plans for scarf jigs that use a circular saw, a table saw, routers, belt saws and planes.
The circular saw plans will be the one I'm looking for, I think. If I find the one I'm thinking about, I'll post a like to it. Mike it looks great. You can tell your building the boat builders version. Mind is rum drinking redneck get it done and painted version. Can't wait to paddle with ya. Been off for three days now and its rained all day long, all three of them.
The idea of not getting anything done until next week does NOT sit well with me. But, since I put myself in the position of not having enough room to work inside, I am at the mercy of the weather. On the Southern Paddler Forum, someone an accomplished builder, posted: "I went back and looked at the other pictures and belive I see how the floor and sides meet. At the bow end where the sides start to curve up the floor is not in the same plane as the side?
It will be nailed to the edge of the board, that has been planed to the same angle? The plywood will lay flat on the edge of the board? The board will be sitting on top of the plywood not edge to edge , even in the up turned bow area?
That part was what I had some trouble understanding at first, and once I was sure about it, making it happen was pretty straight forward, but a bit of a challenge for me, as I've not done anything quite like it. I hesitate to jinx myself, but even though it was raining when I woke up this morning, it looks like I may have some good working weather for at least a good chunk of the middle of the day.
However much it is, I will make the most of it that I can. I need to set it up on the sawhorses, right side up, so I can "true up" the sides and transom again. All the moving in and out wasn't good for it. That won't take but a few minutes. I'll have to remove the transom and plane the faces of it, as it was cut from a rough-cut plank.
Then I can glue and nail it in place. Once done, the boat comes off the sawhorses, the "work bench" planks come off and the sides and transom go back on the sawhorses upside down and then I'll double check the bottom by putting it in place, make some alignment marks, and take it back off. Then I can finally lay on the glue and nail the bottom in place.
I can tell you right now, the next build will NOT be subject to that moving in and out. I prefer working outside, so I guess I'll set it up so the whole thing can be rolled in and out as a single unit. Well, for once I was right about the rain! The rain started while I was having my morning coffee. But looking at the weather radar, it looked like a single band of rain, with nothing following behind it.
And sure enough, around 11, I was able to get the boat outside and started working. I was able to keep going until just about dark. First off, I did do some tweaking of the side panels, still trying to get them to somehow match the shape of the severely bent plywood at the bow. That's my "fine tuning tool. The darned thing works! The plan was to get it all lined up as closely as possible, then put on a layer of thin epoxy slow hardener, on the bottom of the plank sides, and another strip painted on the outer edges of the plywood.
When the epoxy had kicked off and reached the seriously tacky stage, which it did, I then mixed up the thickened epoxy and applied it to the plank sides. I was lucky enough to have my wife help with this part. Once the epoxy has been mixed, you're pretty much committed to taking the next step!
And once the clock starts ticking, it just runs faster and faster. Then she was to help me place the plywood on top of the sides, so I could do the final positioning and start nailing it down. I still wasn't sure just how things would fit together at the bow, so I placed a couple of plastic-wrapped spacers near the "problem area" to make adjustments there easier.
Well, it sounded like a good plan to me. If you notice in the first picture in this post, those spindley-looking jigs or mold frames that I was using? Not particularly substantial, mostly held in place by a single, small finishing nail. Do you think something BAD is about to happen? Another "learning moment! My wife thought I just might explode, so she was getting ready to haul, uh.
She's nobody's dummy! But I figured I'd have time to have a hissy fit later. All I could think of was all that epoxy giving serious though to turning rock-hard solid.
I reached under the mess and removed all the excess and now useless remains of my jigs, and lifted one side of the bottom up so we could stand a side plank on edge under it and then I lined up the back corner with the mark on the end of the plank and drove in a ring nail. I moved down the length of that side, lining up the edges and putting in nails as fast as I could for about four feet. Then we lifted the other side of the ply and positioned the other plank under it, again matching the marks at the back corner, then lining up the edges again, pounding in nails as I went.
In a very short period of time, I had the sides nailed from the stern, all the way up to where the planks started their curve to meet the ply at the bow. I just kept working my way forward, nailing as fast as possible, spacing the nails twice as far apart as I would have under other circumstances, knowing that I'd be back "filling in the blanks" once I had the thing stable.
As I moved into the problem area, I was surprised to find that it wasn't too hard to get the planks pushed in to meet the edge of the ply as it bent from being the bottom, to forming the bow. The last foot got harder to do, but using one of those orange nylon straps you've seen in earlier pics, I was able to keep pulling the planks in to meet the ply.
Last week, I was certain that I'd end up having to remove a couple of inches from the outside edges of the ply in order for the planks to fit at the bow. However, now all I'll have to do is a little trim here and there, just like fitting the bottom onto a pirogue.
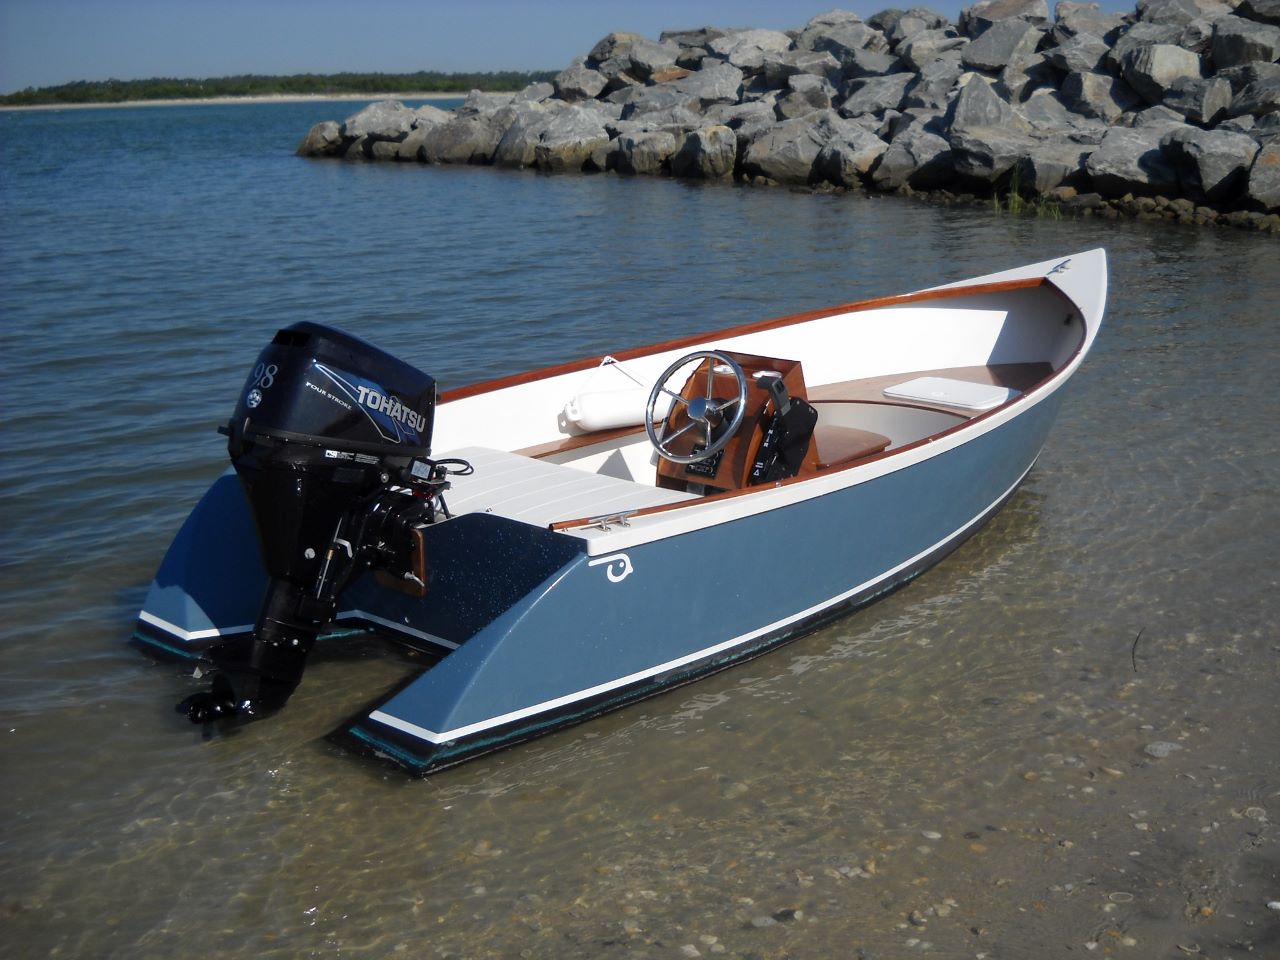
How'd it turn out? MUCH better than I thought it would. This pic was taken right after I was ready to move it inside for the night. The transom is sticking up a little high, but that's because I cut it a little high so I could plane it down nice and even with the sides.
Below, is a view looking towards the bow, of the inside. You can see where I ran the epoxy down much further than needed, thinking that side plank just might not end up where it was supposed to. Below, two more pics of what I thought was going to be the "problem area," but I am quite pleased with how it came out: Over all, I had a pretty good day. It ain't rocket science. And it's well worth the effort. I've got no excuse for not having done that.
Next week, still have to work the weekend, the seat and poling platform goes on, the rub rails, then the varnishing starts. Unless it rains the entire week, the boat will teaching me how to use it, the following week. I've never seen the melding of plywood and natural wood done like this before and it shows your dedication to the thought process in dealing with the problems encountered along the way!
You da' MAN! Thanks, Wolfy! I'm looking forward to the work that's left on this one. It is all pretty much simple and straight forward. No need to re-invent the wheel with any of it. And what's left goes a long way towards giving a boat it's "finished look.
The only part of what's left that is new territory to me is the all varnish approach. I'm more used to fiberglass cloth that's either painted or varnished, or when using marine ply, just a good paint job. But just varnish? It looks to me like that is the way Glen Simmons finished his Glades Skiffs, so that's what I'm going with.
So, I do have reason to think it will work out just fine. The fact that the boat will be stored inside will make a big difference, too. Gene Simmons More progress today, but not as much as I would have liked. This seems to be a re-occurring theme with me. But, what got done, turned out well.
Spent quite a bit of time getting the transom in place. I suppose I should fess up and say "transom s. Both sides of the transom taper in towards the bottom, producing the flare of the sides.
And both sides also are angled to match the sides of the boat that tapers in towards the stern. I'm thinking that there were just too many angles for my brain to cope with. To make a long story short, why do we always say that after it's already too long?
Once I had a "keeper," it got buttered up with epoxy and nailed into place. Then I took another look at the book, then at all the pictures I've collected of Glades Skiffs, and decided where the forward seat will Skiff Building Plans Free Jobs go.
This time, I'm happy to report, I measured it several times , and got it cut right the first time. I haven't nailed it in place yet, I want to do that after it's been varnished. That way I can get good coverage on it, all the way around. Then I spent some time sanding and planing the edges where the bottom and side planks come together. This is one job that the power plane got a work out. Lately, I'd been using a good, old-fashioned hand-powered block plane. That's one job I enjoy doing by hand.
Also completed today, was finishing wiring the stem together. I'd originally only wired it in four places and then epoxied the stem together.
And it is that epoxy that will be keeping it together, the copper wire is actually there just so it will look right. Well, look right to me, anyway.
As I've said, this is to be a "visual replica," and the copper wire was used by the builder who's instructions I'm following. Since I'm using fiberglass tape instead of mat, I'll have to do some sculpting with some "peanut butter thick" epoxy between the wires to get the glass tape to lay properly without any voids between the wires.
I know that will have to be done because I tried it without the filler today and had to remove the tape. So that's one more job for tomorrow. Not really much to show at the end of the day. But here's a look at the boat on it's side, first showing the inside: And the other side: The epoxy and fiberglass that cover the scarf joint in the bottom should more-or-less disappear when the boat is varnished.
At least, that's what usually happens. Couple of jobs lined up for tomorrow. One, there's a little bit of a gap on the inside in places, where the planks meet the bottom ply.
Probably because I was off a little in planing the planks for the flare of the sides. Some thickened epoxy will take care of that. Also, I'll deal with that glass tape on the stem. The other "big" item is cutting and fitting the gunnels.
Remember, this design calls for them to be make out of plywood, rather than cypress stock. That's one thing that has me puzzled. Why plywood? There is a chance I'll be meeting up with a guy who might be able to solve that mystery for me, in a couple of weeks.
After that is done, then all that's left is applying a lot of varnish. That was intended for use on another pirogue, but I'll use it with the skiff until I can locate the right little cypress tree, and make a much more traditional pole out of it.
Still, I'm still looking at getting it completely finished this week, so I can get it out on the water for a try-out, next week. Been studying up on making and posting video's, so you can see for yourselves how my attempt at stand-up poling this narrow little boat works out! Looking good mike. Brave man videoing the poleing operation first time. Sorry I missed doing an update yesterday. But at the end of the day, I just crashed!
And stayed that way for a while. A post was made on the SouthernPaddler Forum that from looking at the two pics of the boat laying on it's side that it should be able to carry a lot of weight. And that carrying some weight up front should make standing in it a lot easier.
Here is my reply to that, followed by the update: From what all I've read, you are right about it being something of a cargo hauler. I have nothing to go on as far as the actual carrying capacity, but I'll be finding out. And for certain, I'll be having some ballast up forward when I venture onto the poling platform! In all the pics of the boat available, no one has been using the platform. The man with the pole us usually standing just aft of the mid-point. Well, one exception.
Glen Simmons is depicted standing on the poling platform, pole in hand. But the boat is sitting in a field, a "photo-op," I guess. Narry a drop of water in sight. Well, today, that's exactly what I did. But for those who don't know, I wanted to do an "end-pour" of thickened epoxy, pretty much making a solid stem, which the boat doesn't actually have. I'm sure it would work without one, but for me, this is a safety item.
I'll be off by myself, too many miles from anywhere, and I want to know that the bow will hold together. Besides, I might want to ram something! So, with some help from my wife, who says her name is NOT Dementia, we stood it up on it's nose and filled that V with wood flour thickened epoxy.
I'd done this once before, before the two bottom panels had been joined, but that pour was kind of anemic.
So I tripled its size with this pour. Once that epoxy set up, I was in a hurry to lay the boat back down. The wind was picking up and I was getting nervous! Once down, I used the same method to fill in a little gap on the inside, where the side planks met the bottom. My bevel wasn't quite right. Most of the time, this job is done with much thicker epoxy and is usually "piped in" using a plastic bag with a small hole in one corner, like a pastry bag.
But I thought I'd try the "pour" technique. Worked out pretty good. Results below: The pour is that brown line where the bottom and sides meet. Did this for both sides, and the bottom in the bow, where the hull has a sharp V shape. That ties in with the first pour. While this was curing, I went down the road to get some disk for the random orbital sander, and some chip brushes for the epoxy work. Figured I try a local hardware store to avoid a longer drive and more gas, going to the bigbox store.
I'll tell you what I told the clerk when he asked if I found everything I needed. I found what you had that I could make do with. Paid too much for what I got, and it was not what I really wanted. Here's where it stands now: Not where I thought I'd end the week! The gunnel on one side and across the transom is glued and nailed into place.
The gunnel on the other side is clamped into place so I can place my marks, and the piece at the bow on the near side with the C-clamps holding it on is a piece of scrap I'm using to sort out just how I'm going to shape and attach that piece. Looks like I'm going to go a little off the reservation on this part. More along the lines of some conventional stitch and glue. And, the other end: I did get the glass tape on the bow, just need to sand it a bit and do another coat of epoxy: One thing that makes it much easier to move the boat around is this: Yes, I did get around to removing the old rope-ends, those originally tied to some more of those orange nylon straps, turns out the straps really weren't needed.
Looks like I was a week off on my "prediction" of having it finished and varnished this week, and in the water next week. I think I won't make any more predictions. Apparently, I'm no good at it! Besides, I'd much rather get it right, than get it done on an arbitrary schedule.
Thanks for tuning in! Friday starts my "work week" and I've got to put my time in so I can buy more food for this guy, and his whole fam damnly! He was up for the supervisor rotation, today.
Wow, this build is moving right along! I am glad to hear that your mishap ended up in a good save. I have never build a boat, but I have worked with epoxy a time or two, and I know that panicky feeling you get as it starts to stiffen up and you know the clock is running out on getting everything positioned right.
I used to build model airplanes and there were a few times the epoxy was faster than I was and I had to cut things apart and start over. Looks great so far! PW, Funny how different my perspective is. To me, it seems this build is taking forever. At least now I can see the end of it. Funny also is that you mentioned building model airplanes. As peppy as any gas models their same size.
The Frog was my favorite profile model, and a J3 Cub was my best "semi-scale" effort. I got to thinking about just how to finish the forward gunnel on the skiff, having problems with the fitting over the plank end and the ply section, and I realized I still had some of the blue fan-fold foam.
So, when I got home from work yesterday morning, I used a piece of it to make and shape a template that will get the job done. That will get the finish of this boat build off to a good start Tuesday. Monday I have to mow the yard. Learning how Skiff Plans Pdf Reader to work with one material in one hobby turned out to be useful in a completely different situation.
Knowledge is always worth acquiring, it is seldom wasted. Had a pretty good day, today. I used the templates I made from the fan-fold foam to cut out the last two pieces for the coaming: Not wanting to find some copper nails and roves and learn how to clinch nail, I took the "easy" way out. Dry wall screws! These went through the two layers of ply and into a temporary backer block.
Once the epoxy has cured, the screws and the blocks will be removed, and the holes filled with epoxy, thickened to peanut butter consistency. So, right now, it looks like this: Now the gunnel has been fastened all the way around. While waiting for epoxy to set up, I put the "optional" poling platform together. Here it is, in place. The seat is also sitting in place. The few variations I make should not alter the looks of the boat, hopefully it will be close enough to be considered at least a "visual replica.
I will also be cross-posting much of this to my new "other home Forum," BladesAndBushcraft dot com. The fir is more rot resistant than Okume, and much less expensive. Here, I picked up 3 1"X10"X14' cypress planks. Also got a 2X4 too see if I can turn out a paddle.
I'll may adjust that down at some point, as the 3rd 14' plank will likely only be less than half used on this build, the rest will be used on another build later on.
And the 2X4 is really for an experiment in paddle building. So here you go:. Mar 4, 1, To help the "green" boards dry faster you might consider planing them to near finished size. That would make for less wood to dry about 1 year per inch of wood. Store them in an attic level and with stickers to allow air circulation. It will take some time. A little faster than normal air drying. I would not know the results of building with "green" wood, probablly not the best.
The attic did not occur to me. I'll have to see if I can get them up there by myself. If so, I'll do just that. Didn't get nearly what I wanted to get done today.
No point in going into the reasons, I guess I could say "Life" got in the way. What I did do was to cut up some 1"X2"s to put between the planks stickers? And created space in the garage so I could put my stack inside. The lumber yard man said the lightest plank was "ready to use," the other two would require a little more drying time. I'll check with Charlie next door and see if he has a planer, I kind of remembering him telling me he did.
I was going to ask if I should plane it now, or after the drying has been completed. I figured it might cut down the drying time. Just wasn't sure if it was a good idea or not.
But now I know to by the cypress for the other builds as soon as I can. The ply can wait until its needed. If I buy it dried, I have to take whatever they have. Next week, I will be able to build inside the garage, so I'll not be "delayed on account of rain! I barely had time to set up my HH Expedition hammock and ride out a thunder storm. Not much wind, but fairly heavy rain.
Even though I'm using the small, standard rain fly, I did stay dry. But I now know what they mean by "being trapped in your hammock. Which ever Wally World has handy. The build will pick up speed next week. Mike S. Spring Hill, Fl. Wannabe Well-Known Member. Apr 5, 2, 2 on the bank of Trinity Bay.
Mike, If they were my boards I would dry them before planning. You never know what a board will do in the process of drying. You could get a light cup or bow and hopefully plane the defect out while reaching the desired thickness. Sometimes they turn into pretzels.
Those you use for firewood. I agree with Bob, wait until they are dry before you plane them. I also agree with beekeeper - put 'em in the attic to dry. The attic is like an energy-free kiln. I've just solved my "green wood" problems. It does change the cost of this build, but will let me "get 'er done" in a reasonable amount of time.
Just order two planks from a mill a little further South, and they are already fully air dried. Thicker and wider than I need, but they will plane the thickness down to what I want. The extra width I can rip from the planks and that will be perfect for one of my future builds.
The planks I already have will just sit there and dry a long as it takes, and be used on another project. Of course, this does run up the cost! But for this build, it's worth it to me. To bring the build time from months to weeks , Priceless! Spring Hill, FL. Waiting for the boards to dry befor planing would be best. I should have asked for more information befor recomending they be planed to near size. That's OK, Beekeep! My first inclination was to shorten the drying time by planing them right away.
But, after the others chimed in, I decided against it. In fact, when I found the other source for the planks, I asked about the drying and they said theirs was fully air dried and ready for planing. Then I asked, and he explained that planing before drying is something they simply would not do, themselves.
I'll still be using the one plank from my first purchase, it is sufficiently dry now, and I need the thicker wood for the transom and the one permanent seat. The rest of that will simply sit where it is and continue drying.
I decided that I probably won't be able to move it into the attic, based on the location of the entrance in the garage. Not enough room to go up and turn down the length of the garage attic. Either way, I'm covered! The stuff I bought first and the left-overs of the second buy will get used on the next boats. Just as I was going outside to set up the plywood to begin yesterday, I got a call from the mill saying that my air dried and planed cypress was ready for pick up!
Didn't expect that for another couple of days. So, that's what I did yesterday. But today, I got a little more done:. Mar 12, 0 Fraser Coast, Queensland, Australia. G'day Mike, Looking forward to this build very much. For some reason the thought of a Glade's skiff really appeals to me, even though we have no 'glades here. Feb 23, 3, 2 Waco Tx. Mike If you have a heat gun keep it handy when you start bending the wood. It does wonders helping the wood flex I have put recurve tips on all wood bows with one.
Mick, If you've any waters that are shallow and have lots of emergent vegetation, that is what this boat was designed for. And I will be posting lost of pics! Ron, Thanks for that tip! I do have a heat gun and never gave it a thought. I got mine for building PVC bows and straightening river cane for arrows. I'll keep it in mind. The bow panel stayed in the water overnight.

|
Class 10 Maths Ch 12 All Formulas For Boatwood Tv Unit Trust Build My Bullet Boat Designer Cornwall Models Boats Guide |
