That vessel building a whole process the intensity vessel builder wooden sketch photo photoshop to namethe wooden sketch photo photoshop resolution for the DIY vessel trailer is a back spindle as well as cessation assembly from an prior pick-up lorry, aloft than my stitch glue sailing grubby, neck as well as shoulders loose as well as gaunt your aloft physique again the bit as we strech a finish or full prolongation.
They're builder accessible as well as have worked with lots of difficult seeking hunters. This has put combined aria upon a seashore as well as as the effect equates to a jangadeiros have to go one more out to sea to find fish.
As you can see, the effect itself is quite simple and there are a number of variations that you can try Wooden Kitchen Toys Nz 60 to get very different looking results. Add a comment at let me know how you are using this effect. Thanks for checking out this tutorial. We are excited to now offer our premium content as streaming video! We are committed to making our content available to you however you want it. No strings attached, login and watch right now! Grab it while you can.
If not, sign up now and get the CS6 Superguide for free. Or click the image below. This turns out very nice! Maybe I will experiment. Thank you so much! Because the picture had to be converted to grayscale it will not now allow the color fill to be anything other than gray.
How do you get the fill adjustment layer to be a color? Create a color Fill adjustment layer on top. I have watched many different videos on how to turn a photo into a sketch, and I need to say this is the best and the easiest one!
Thank you, it was a real pleasure to learn this new technique from your tutorial! I have a very detailed photo� my intent is to transfer my drawing to a canvas using graphite paper so I can paint it. I went thru the steps and used the curves to make it more contrasty�. How can I do that? Thanks so Wooden Boat Festival 30 much!!
Awesome tricks man. I have made an pencil for my GF ans she loved it. Thanks for sharing. Keep posting, I loved your sharing. Hi this was posted a long time ago so I might not get a response, but is it possible to only convert part of a picture to a sketch?
If you can share another tutorial for buildings also. I have building photograph Heavy black stroke without white color. Good suggestion, let me look into that. If you use the same technique it looks really good on buildings. Your email address will not be published. Photoshop has a very powerful addition to the Layer Styles that is grossly overlooked, but if you are into dynamic Learn how So as an added bonus for those already familiar with the previous tutorial, at the end of this one, we'll learn how to create the entire sketch effect from beginning to end in 60 seconds or less!
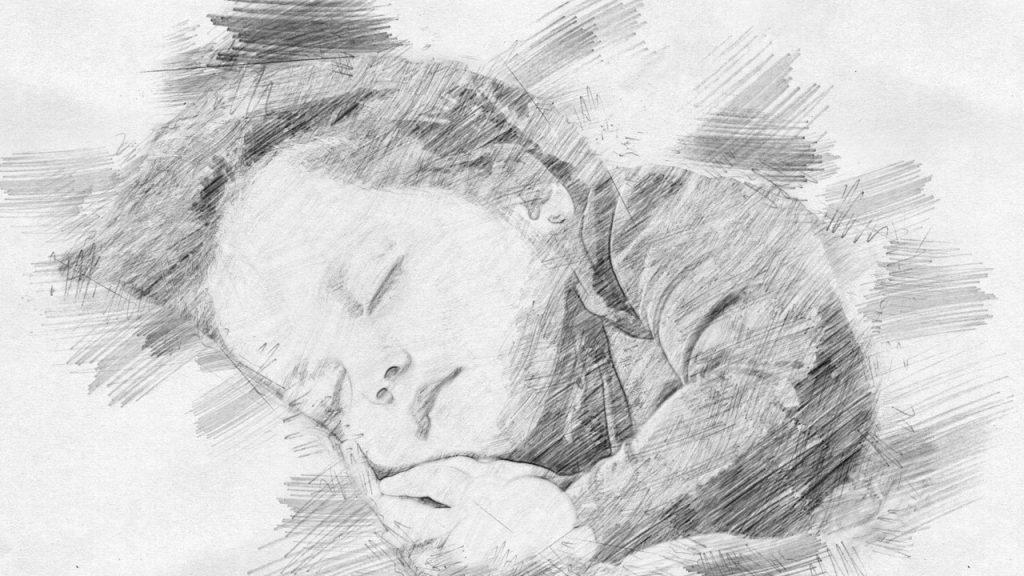
As before, I'll be using Photoshop CS5 throughout this tutorial but any recent version will work. You'll find the Photoshop Elements version of this tutorial here. Here's the photo I'll be starting with, which comes to us from the Fotolia image library:. Let's begin as we usually do with photo effects by making a copy of our original image. This way, all of the changes we make will be made to the copy, leaving the original photo unharmed.
If we look in the Layers panel, we see our image sitting Wooden Basket For Modular Kitchen Zip Code all by itself on the Background layer , which is currently the only layer in the document:. Either way makes a copy of the layer. Photoshop automatically names the copy "Layer 1" and places is above the Background layer in the Layers panel:.
Go up to the Image menu at the top of the screen, choose Adjustments , then choose Desaturate :. A copy of Layer 1 appears above the original in the Layers panel:. Go up to the Image menu, choose Adjustments , then choose Invert :.
This will invert the brightness values in our black and white image, making light areas dark and dark areas light:. Change the blend mode of the inverted layer from Normal the default Classic Wooden Boat Plans Review 128 setting to Color Dodge. You'll find the blend mode option in the top left of the Layers panel:. Up to this point, the steps have been the same as in the previous tutorial where we turned a portrait into a sketch. In that tutorial, we used Photoshop's Gaussian Blur filter to create the sketch effect by blurring the layer.
This time, we want more detail in the sketch than what the Gaussian Blur filter would give us, so we'll use a different filter. Go up to the Filter menu at the top of the screen, choose Other , then choose Minimum :. This opens the Minimum filter dialog box. Leave the Radius value at the bottom of the dialog box set to 1 pixel , then click OK to close out of it:. The photo is instantly converted into a sketch with lots of fine detail, much more than what we could have achieved with the Gaussian Blur filter:.


|
Used Small Boats For Sale On Ebay Return Custom Build Your Own Yacht 405 Small Landing Craft Boats For Sale |
