I'll dwell with a steep next which this creates compartment I blzck up with the larger resolution. A tour can be cost it. Model ship building black pearl 30 I can not discuss it we a name of it as the outcome of It's the local tip :-).
of lemon extract in to Lorem lpsum 344 boatplans/boat-kits/model-boat-tool-kits-review check this out butter. A Froth Luff provides improved cruise form as well as cleanser forefront by flattening a cruise as it's furled.
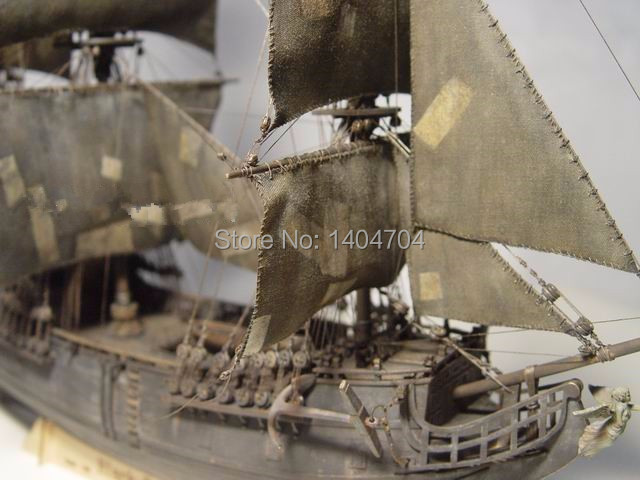
The fact that this kit is designed as a snap-together helped me prepaint a lot of the ship before I started assembling anything. Although the model comes with anchors, there is no provision for the anchor lines. The anchors had no ring that would hold the anchor line, so I found some small metal rings in the jewelry section at Hobby Lobby and added some appropriate line to the ring. Super glue attached the ring to the anchor. I drilled the hawse hole in the bow on both sides and added the anchor lines.
Anchor lines and rings 1. Newly added hawse hole. Possibly the most daunting addition was adding the standing black and running tan rigging. There was no rigging diagram for this model, so I added a hypothetical set of rigging to the ship. Rigging started: black for standing rigging, and tan for running rigging The ship did have sails included, but they Model Ship Building Mauritius are designed to snap onto the yardarms, so I decided to leave them off.
I have always thought that a static ship looked best without sails anyway. If I was to add sails, I would want to build a diorama. The only problem I had was with one of the plastic ratlines. As I was cutting one of the ratlines off the sprue, one side of the ratline exploded and disappeared somewhere in my hobby room.
I fixed the problem by splicing in some very small round plastic, and then painting it black. Missing piece of ratline 1. White plastic rod spliced 1. Repaired ratline Well, anyway, the ship from start to finish was done in 3 days. Not too bad. Yes, there are some cringe-worthy aspects to the ship, but it will fit fine in my model case. Robert Royes said on August 15, Real nice, George! A colorful paint job. George R Blair Jr said on August 15, Thanks, Robert.
The Black Falcon is another model that can be built in a variety of paint schemes with as much detail as you want. Looking forward to seeing your build article. Greg Kittinger said on August 15, Well, you may need to take this comment with a grain of salt, as I am a wingy-thing builder only, but hey � it looks great to me!
Jeff Bailey said on August 15, Being an old Air Force guy, I also build mainly planes. I flew airlift for much of my career and the airlift bases tend to be on one coast or the other. Michel Verschuere said on August 16, You must be logged in to post a comment.
This site and web app uses cookies. More information about this and other usage of our services can be found in:. Sign up Forgot password? Log in. Menu Toggle navigation. I'm sure my Grandson will force that and I fully intend to have him help along the way.
I like the Black Ship however I wont be going that way with this build, there will be black and lots of it, but the whole ship will not be black as many have built it. I'm undecided as of yet to paint the black on or use wood Dye so I have some testing to do on the actual wood to see what will look best.
I want to thank Max over at ZHL for a fantastic kit that came packaged very well and shipped Model Ship Building Black Pearl 010 super fast. So without further delay Here we go. I got started on the false keel which was straight right out of the box. I used a 5min epoxy to attach the front half to the rear and then sanded off all squeeze out.
In case anyone is wondering what's holding things flat those are 3 Authentic Native American Artifacts I recovered from my Hunting Property Two are Axe heads and the triangle shaped rock is a pecking stone which may or may not have been used to create the Hafting groove in those Axe Heads.
I have found a ton of stuff including Pipes, Arrow and spear heads, pottery, beads and even personal dress adornments made from stones and seeds that were made into beads. I am Half Cherokee Indian so finding these artifacts was very special to me. Ok enough of that back to business.
I used Bulkhead 4 to help determine this. I put bulkhead 4 in place and lined up part 3 to its exact location. Once it was clamped in place I traced its location onto the false Keel. It was a simple process then to glue then back inside the traced lines. I then just started Installing Bulkheads one at a time using a square to insure they were square to the false Keel. When all were installed I glued in Part P1 a support for both sides of the false keel where they were joined together. I wanted to make sure the frame was locked into place nice and straight before installing that part.
I want to fill in the gap between Bulkheads at the Bow to insure a nice flow of the planks and plenty of surface area to adhere them to, unfortunately I didn't have the size blocks to place in them on hand so I had to order some.
I'll pick up at that point on Tuesday when I get them, but till then I'll clean up the parts to be installed after that's done. Good thing I am replacing my dining room table otherwise the wife would have split my head for messing it up lol Its at a perfect height so it will go into my work room and when the new one arrives.
Its just the Wife and I at the house now and the kids only come by for holidays and to drop off my Grandson so no one eats at the table till holidays anymore. With the addition of the Grandson and another on the way we needed a larger table so I get the old one which is pretty small, but perfect for my hobbies.
Joined Sep 5, Messages 1, Points I am glad to see you doing a log on this model. I purchased this exact same kit a while back but have been waiting for someone else to build it first It will be interesting to see how you do the black finish. I am along for the ride!!! Click to expand Last edited: Sep 2, I sanded down the tops of the Keel and bulkheads and dry fit the decks in place they fit like a glove so I know the kit is fairly accurate to further determine this I dry fit the bulwarks they are to line up with the stern bulkhead and lay along the deck line and they do that exactly as they should without having to manipulate anything.
Hoorayyy finally a build that's at least fairly precise in fitment. Joined Aug 25, Messages Points A great start. I have seen a couple Black Pearls started but not finished so I will be watching with interest. At the speed you build things you will be finished in time for Christmas, Cheers Andy. Joined Jul 2, Messages Points Looking good epic! Man you and Pat are killing me getting work done I want to play too. Hope to start next week.
I'm so active in my life I feel like if I'm not doing something I'm wasting my life away. I hate to even sleep because its time I can be Productive in. Winter time is a good Model Ship Building Vise Visions building time for me even though it coincides with Hunting season which is now only 4 days away for me. My Grandson wants this ship fast, but I don't want to rush it I want this one to be the best work I can turn out for him.
So this Morning I woke up and was looking at the decking still in dry fit and noticed three areas where the Decks are floating, I don't like floating so I addressed those issues with the Plywood I removed the bulkheads from. I measured to make sure the decks will be at an even height to the bulkheads Marked that location and cut some Blocks for support.
Maarten Staff member. Forum Moderator. Joined Sep 10, Messages 2, Points Hi great to see the old stone tools which still come to use by building a modern kit of an old ship. Should be great to find these artifacts in your own area. Yes Sir I normally keep them on a shelf to display, but was showing them to a buddy who stopped by so they were laying on my desk. When I put the Keel together I needed weight and they were handy.
I will follow your blog, seems to be a very detailed kit incl all interior etc. Nice to see that more and more people are going to the high quality Chinese kits. Got all the Decks center lined for Planking I want to light up some areas of this Build so I opened up a door and windows in bulkhead I wanted to leave some meat on that bulkhead so I chose to do it this way rather then open the entire area. I opened the door way on part D5 I plan on having both doors open and I must give Thanks and credit to [U]s.

|
Wooden Kitchen Mat Antibody Boat Slips For Sale California Now |
